> ## Documentation Index
> Fetch the complete documentation index at: https://www.adaline.ai/docs/llms.txt
> Use this file to discover all available pages before exploring further.
# Use parameters in prompts
> Select an LLM and fine-tune generation settings like temperature, tokens, and response format
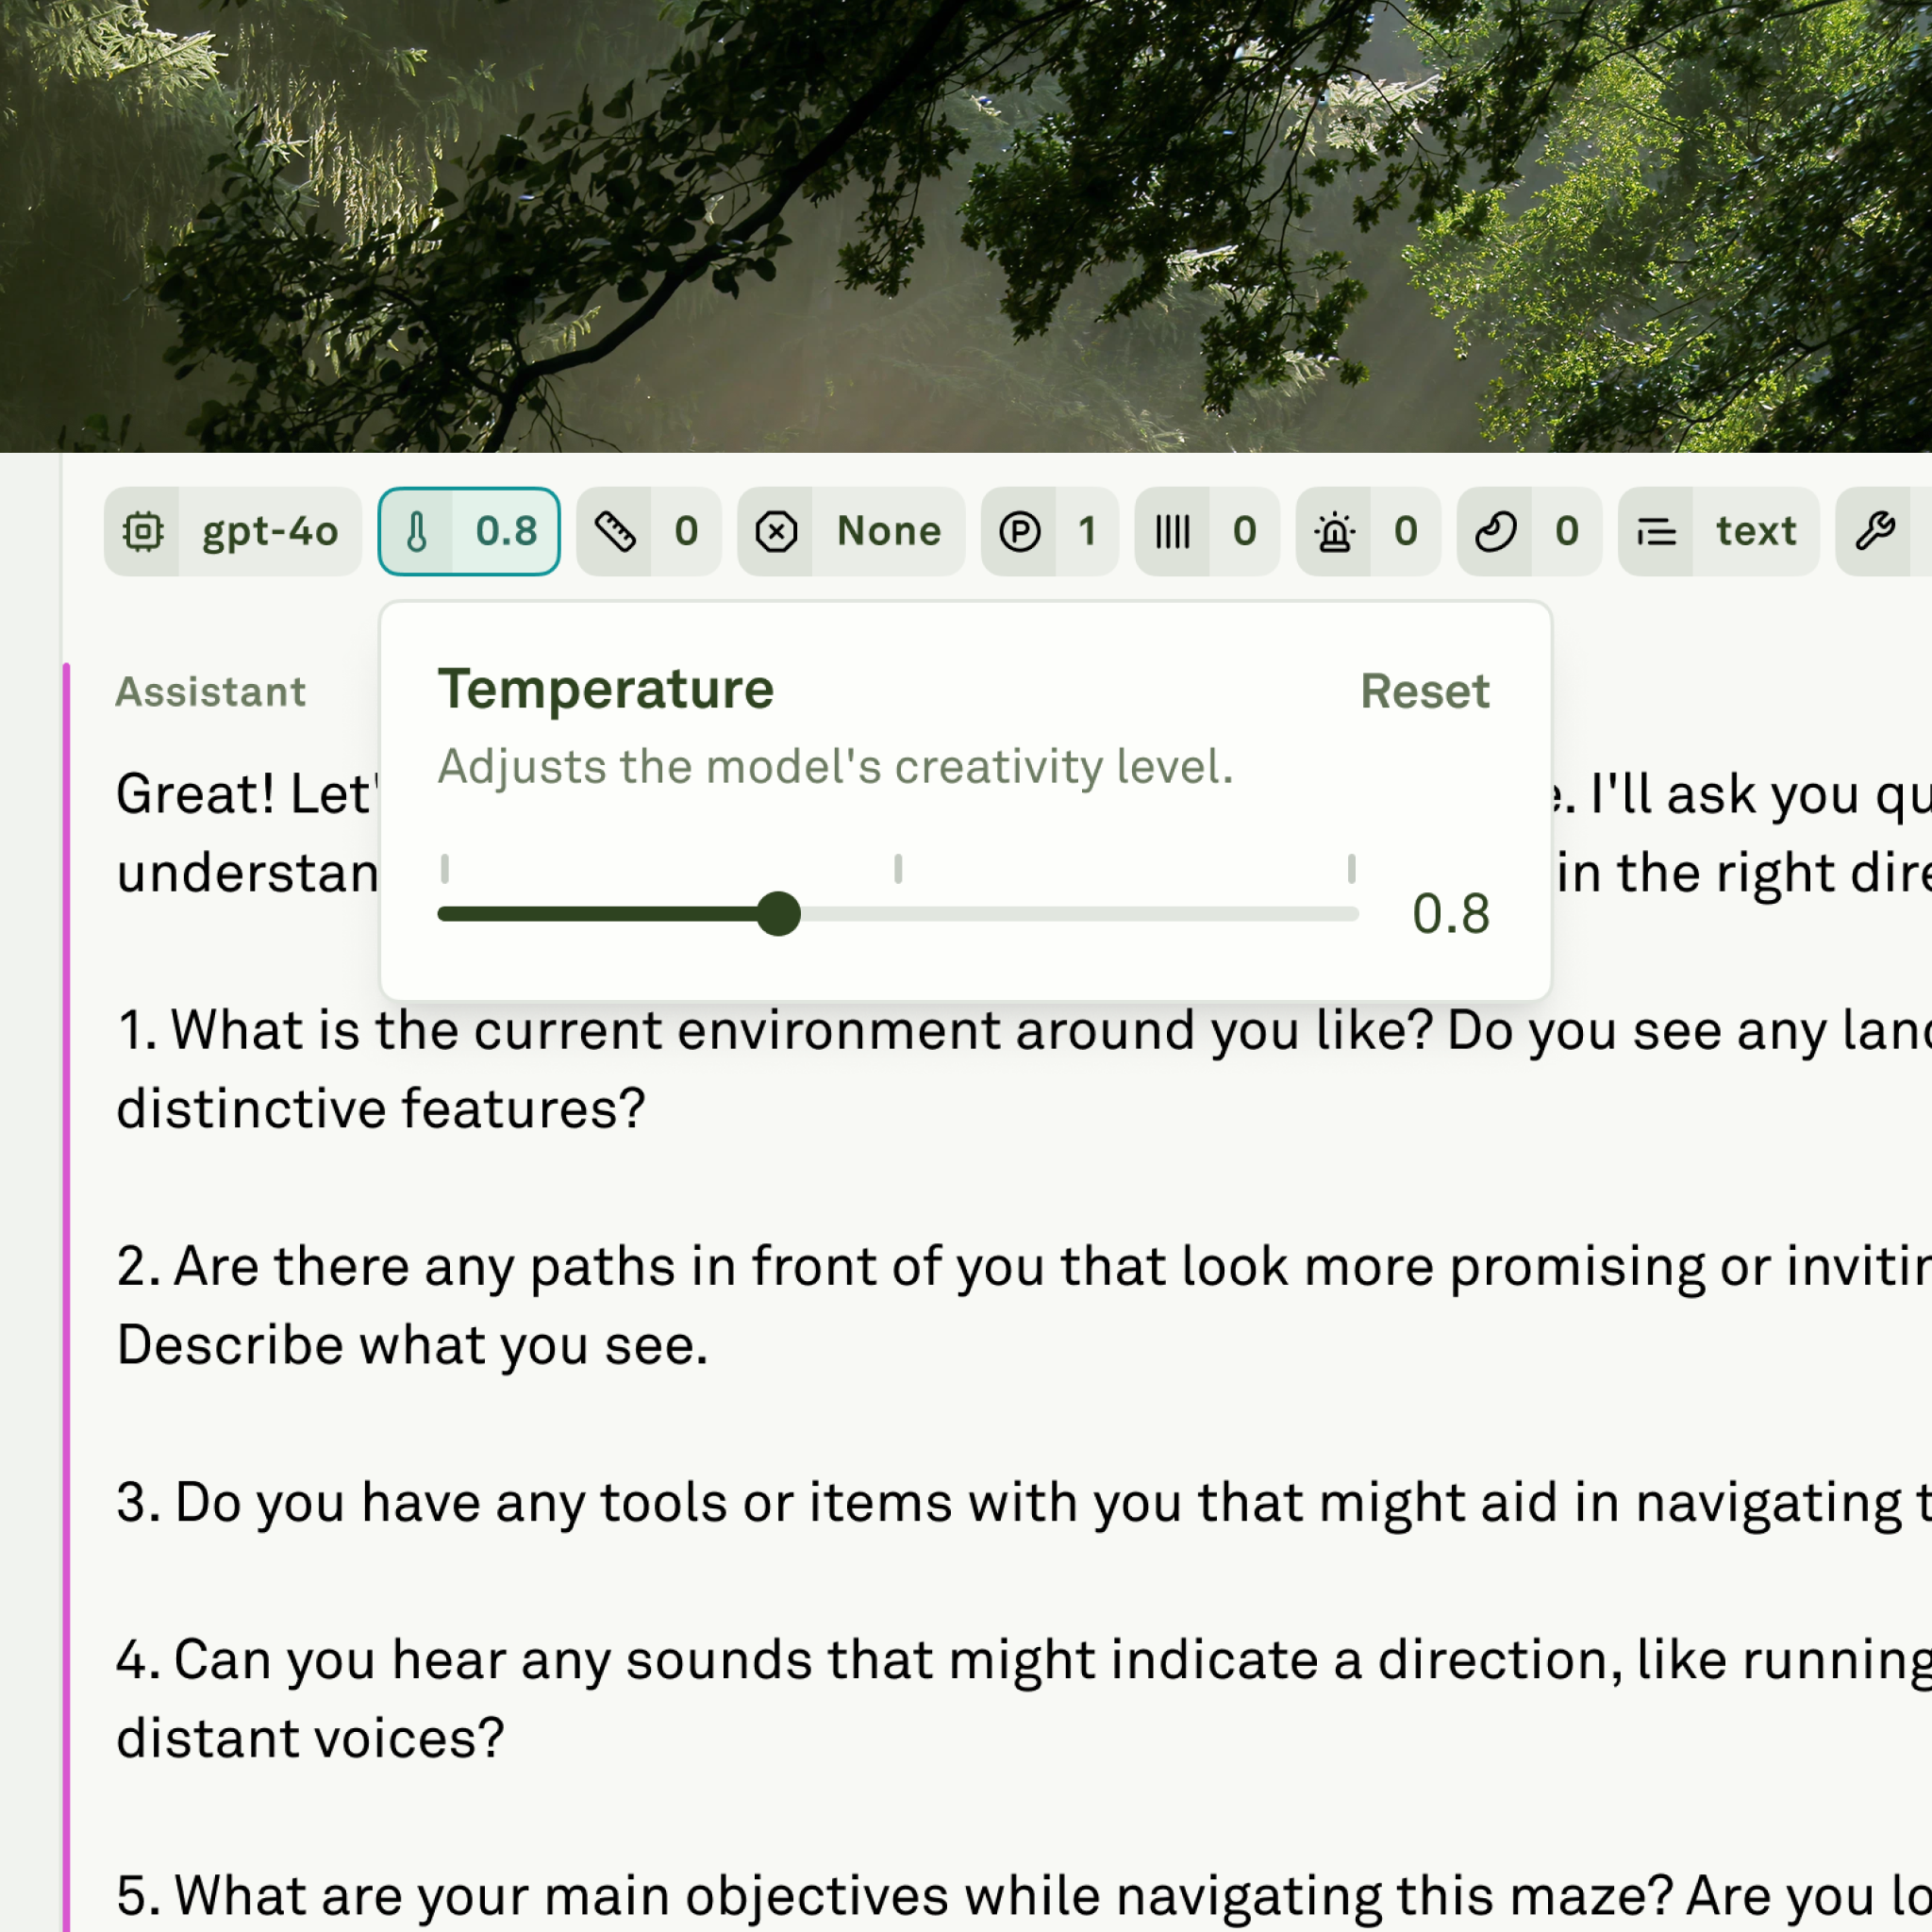
Before running a prompt, you need to select which LLM processes it and configure how that model behaves. The Editor's model settings panel gives you complete control over provider selection, generation parameters, and response formatting.
 ## Select an LLM
Adaline's Editor displays all supported LLMs based on the providers you have configured in your workspace settings. Open the model selector to browse and choose your preferred model:
## Select an LLM
Adaline's Editor displays all supported LLMs based on the providers you have configured in your workspace settings. Open the model selector to browse and choose your preferred model:
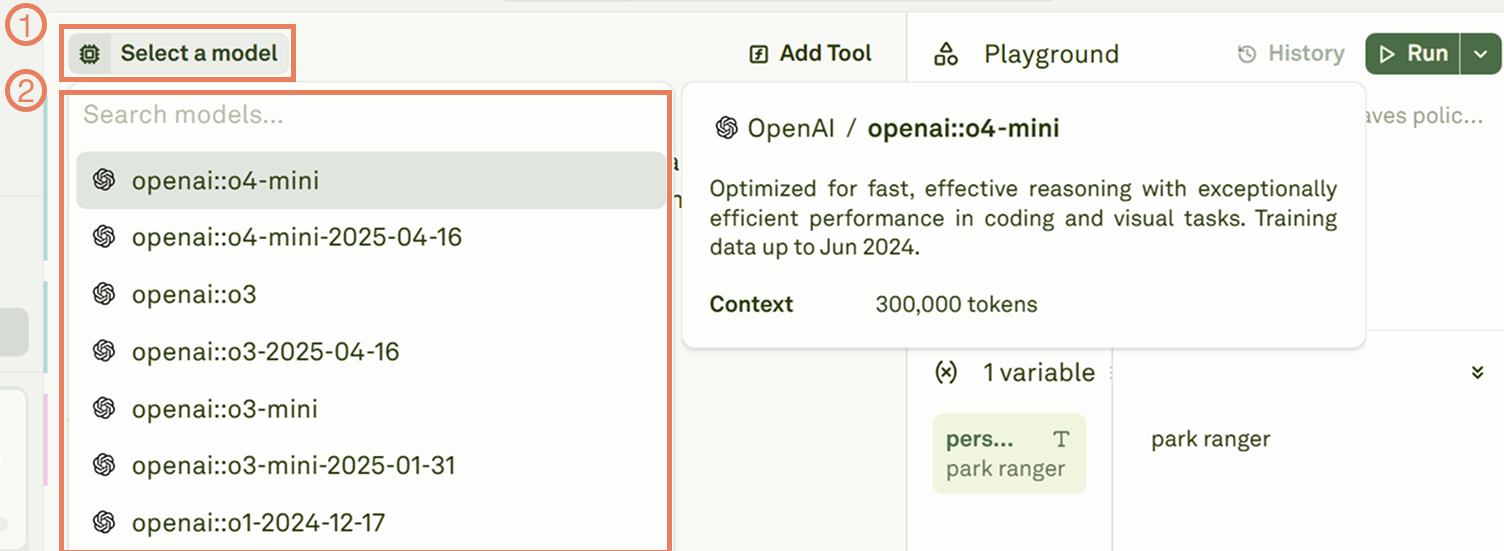 Each model is displayed in the format **`provider::model_name`**. This prefix helps you distinguish between provider accounts when you have multiple keys configured for the same provider — for example, `OpenAI-dev::gpt-4o` and `OpenAI-prod::gpt-4o`.
To add a new AI provider, navigate to your workspace settings. See [Configure AI Provider](/docs/admin/configure-ai-provider/overview) for setup instructions.
## Configure generation settings
Click the settings icon next to the model selector to open the configuration panel:
Each model is displayed in the format **`provider::model_name`**. This prefix helps you distinguish between provider accounts when you have multiple keys configured for the same provider — for example, `OpenAI-dev::gpt-4o` and `OpenAI-prod::gpt-4o`.
To add a new AI provider, navigate to your workspace settings. See [Configure AI Provider](/docs/admin/configure-ai-provider/overview) for setup instructions.
## Configure generation settings
Click the settings icon next to the model selector to open the configuration panel:
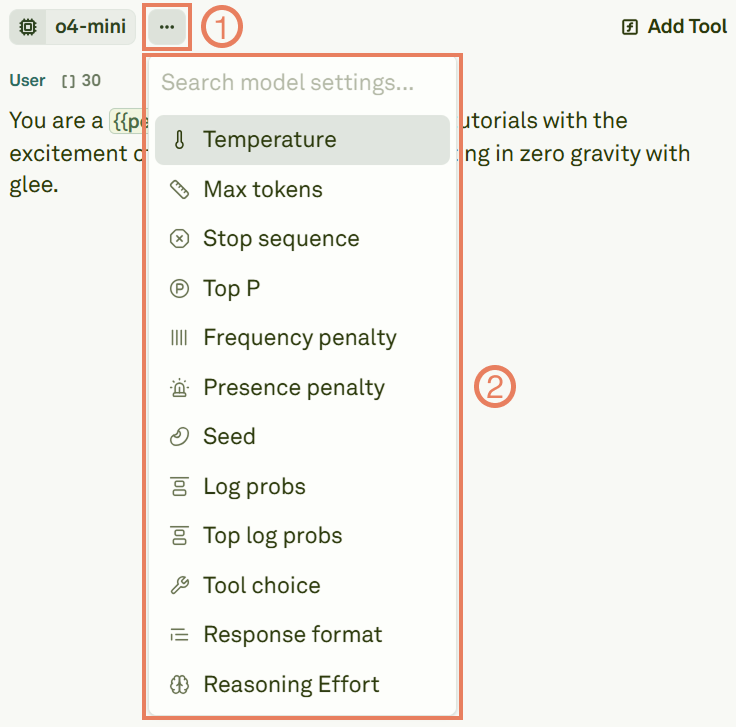 The available parameters depend on the selected model. Common settings include:
| Parameter | Description | Typical range |
| --------------------- | ------------------------------------------------------------------------------------------------------------------------ | --------------- |
| **Temperature** | Controls randomness in responses. Lower values produce more deterministic outputs; higher values increase creativity. | 0 – 2 |
| **Max Tokens** | Sets the maximum number of tokens the model can generate in a single response. | Model-dependent |
| **Top P** | Controls diversity via nucleus sampling. The model considers tokens whose cumulative probability reaches this threshold. | 0 – 1 |
| **Frequency Penalty** | Reduces repetition by penalizing tokens that have already appeared frequently. | -2 – 2 |
| **Presence Penalty** | Encourages the model to introduce new topics by penalizing tokens that have appeared at all. | -2 – 2 |
The interface automatically shows only the parameters that are relevant to the model you have selected. Different providers and models support different subsets of these settings.
## Configure response format
You can control the structure of the model's output by configuring the response format. Click on **Response format** in the settings panel:
The available parameters depend on the selected model. Common settings include:
| Parameter | Description | Typical range |
| --------------------- | ------------------------------------------------------------------------------------------------------------------------ | --------------- |
| **Temperature** | Controls randomness in responses. Lower values produce more deterministic outputs; higher values increase creativity. | 0 – 2 |
| **Max Tokens** | Sets the maximum number of tokens the model can generate in a single response. | Model-dependent |
| **Top P** | Controls diversity via nucleus sampling. The model considers tokens whose cumulative probability reaches this threshold. | 0 – 1 |
| **Frequency Penalty** | Reduces repetition by penalizing tokens that have already appeared frequently. | -2 – 2 |
| **Presence Penalty** | Encourages the model to introduce new topics by penalizing tokens that have appeared at all. | -2 – 2 |
The interface automatically shows only the parameters that are relevant to the model you have selected. Different providers and models support different subsets of these settings.
## Configure response format
You can control the structure of the model's output by configuring the response format. Click on **Response format** in the settings panel:
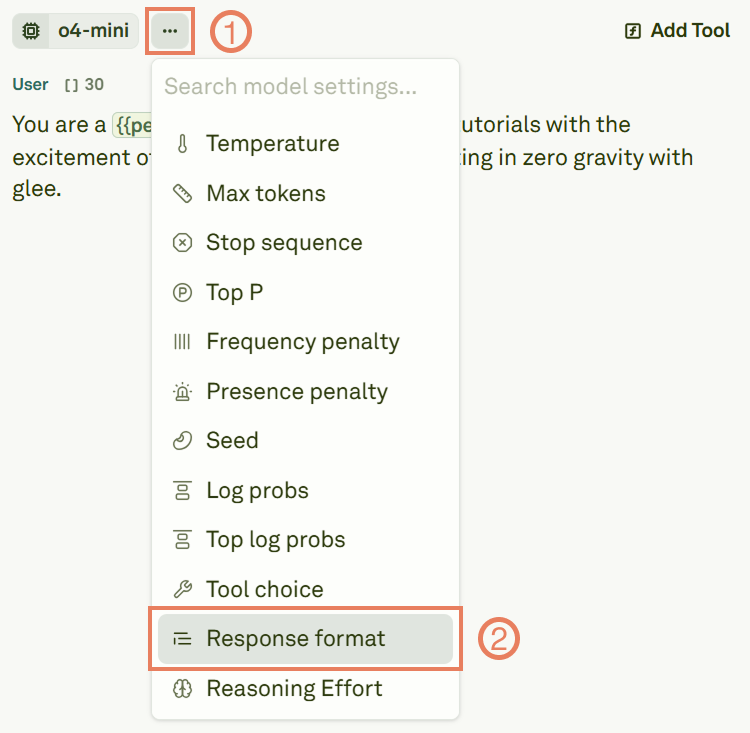 Choose from the following format options:
| Format | Output | When to use |
| ---------------- | ------------------------------------------- | --------------------------------------------------------------------------------------------------------------------------------------------- |
| **text** | Free-form text (default) | General-purpose prompts — summarization, Q\&A, creative writing, chat. |
| **json\_object** | Valid JSON in an auto-determined schema | Quick prototyping when you need structured output but don't need a fixed schema. Your prompt must contain the word "json" (case insensitive). |
| **json\_schema** | JSON adhering to a strict schema you define | Production workflows — API integrations, structured data extraction, pipelines that depend on a consistent response shape. |
### Define a JSON schema
When using `json_schema`, provide a schema definition in the response format editor. Here is an example:
```json theme={null}
{
"strict": true,
"name": "users_data",
"description": "A schema for creating user data.",
"schema": {
"type": "object",
"properties": {
"user_city": {
"type": "string",
"description": "The city where the user resides."
},
"user_name": {
"type": "string",
"description": "The full name of the user."
},
"user_age": {
"type": "number",
"description": "The age of the user in years."
}
},
"required": ["user_name", "user_age", "user_city"],
"additionalProperties": false
}
}
```
Key requirements for the schema:
* The `"strict": true` field is **mandatory**.
* The `name` field is **mandatory** and must use underscores (e.g., `users_data`) or camelCase (e.g., `usersData`) — no spaces or special characters.
* Define the structure inside the `"schema"` field using standard JSON Schema syntax.
The schema you provide must adhere to the [OpenAI JSON schema structure](https://platform.openai.com/docs/guides/structured-outputs). This format is used across all supported providers.
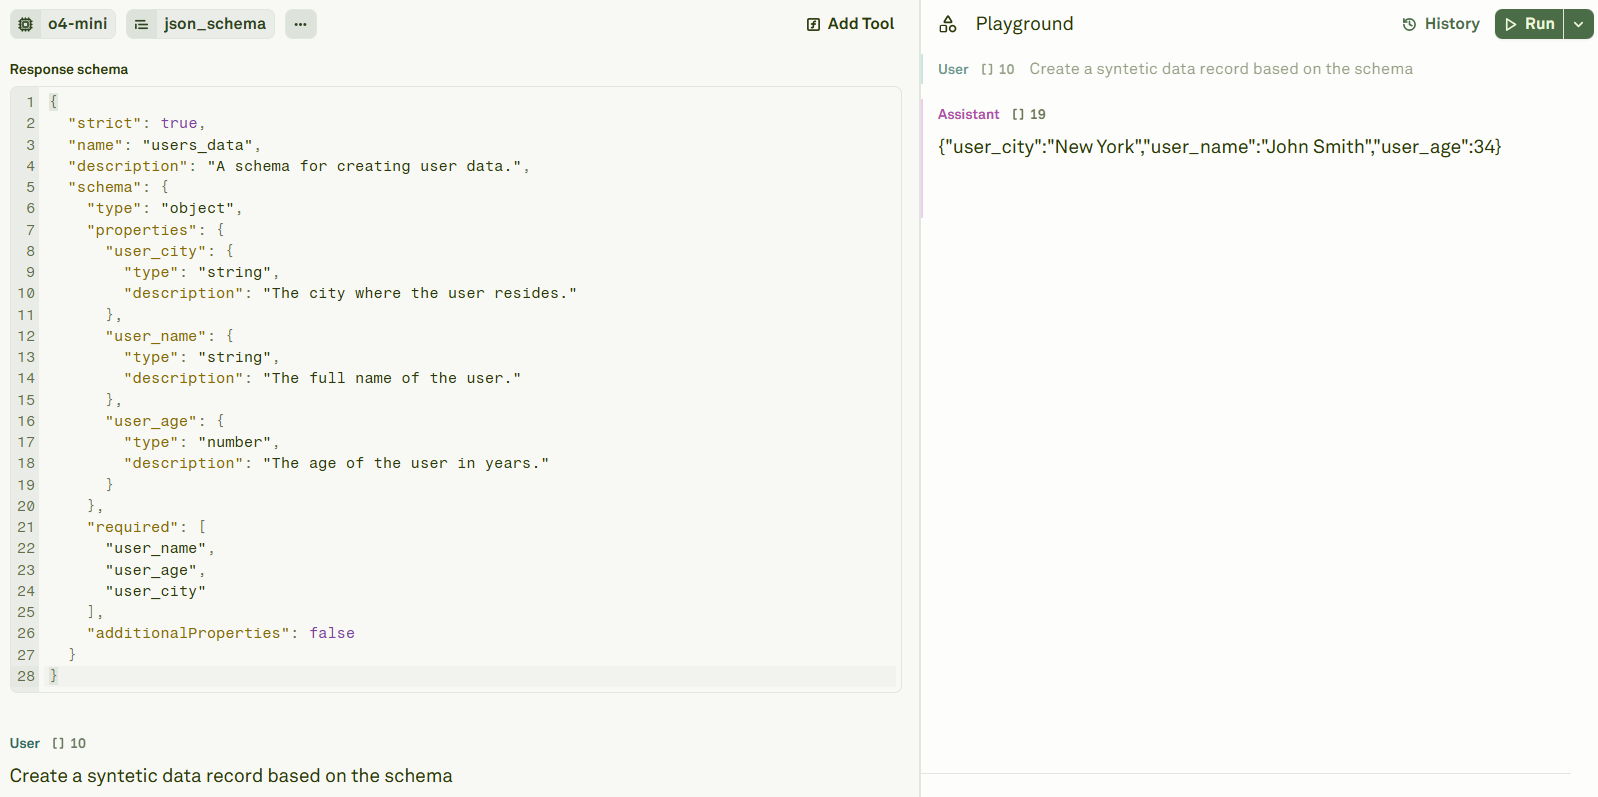
The image below shows a prompt configured with a JSON schema and the structured response from the model:
Choose from the following format options:
| Format | Output | When to use |
| ---------------- | ------------------------------------------- | --------------------------------------------------------------------------------------------------------------------------------------------- |
| **text** | Free-form text (default) | General-purpose prompts — summarization, Q\&A, creative writing, chat. |
| **json\_object** | Valid JSON in an auto-determined schema | Quick prototyping when you need structured output but don't need a fixed schema. Your prompt must contain the word "json" (case insensitive). |
| **json\_schema** | JSON adhering to a strict schema you define | Production workflows — API integrations, structured data extraction, pipelines that depend on a consistent response shape. |
### Define a JSON schema
When using `json_schema`, provide a schema definition in the response format editor. Here is an example:
```json theme={null}
{
"strict": true,
"name": "users_data",
"description": "A schema for creating user data.",
"schema": {
"type": "object",
"properties": {
"user_city": {
"type": "string",
"description": "The city where the user resides."
},
"user_name": {
"type": "string",
"description": "The full name of the user."
},
"user_age": {
"type": "number",
"description": "The age of the user in years."
}
},
"required": ["user_name", "user_age", "user_city"],
"additionalProperties": false
}
}
```
Key requirements for the schema:
* The `"strict": true` field is **mandatory**.
* The `name` field is **mandatory** and must use underscores (e.g., `users_data`) or camelCase (e.g., `usersData`) — no spaces or special characters.
* Define the structure inside the `"schema"` field using standard JSON Schema syntax.
The schema you provide must adhere to the [OpenAI JSON schema structure](https://platform.openai.com/docs/guides/structured-outputs). This format is used across all supported providers.
The image below shows a prompt configured with a JSON schema and the structured response from the model:
 ## Next steps
Structure prompts with role-based messages and multi-shot techniques.
Enable function calling and tool use for your selected model.
## Next steps
Structure prompts with role-based messages and multi-shot techniques.
Enable function calling and tool use for your selected model.