> ## Documentation Index
> Fetch the complete documentation index at: https://www.adaline.ai/docs/llms.txt
> Use this file to discover all available pages before exploring further.
# Integrate your AI Agent
> Connect your AI application to Adaline with logs, traces, spans, sessions, costs, and evaluations
## 1. Sign up
If you don't have an Adaline account yet, create one by signing up at [app.adaline.ai](https://app.adaline.ai/sign-up?utm_source=adaline.ai).
After you sign up and log in, Adaline creates a sample project called `Get Started`. Open the project picker dropdown and select `Get Started` to follow these quickstarts. The project includes starter resources you can use to run a prompt and try evaluations.
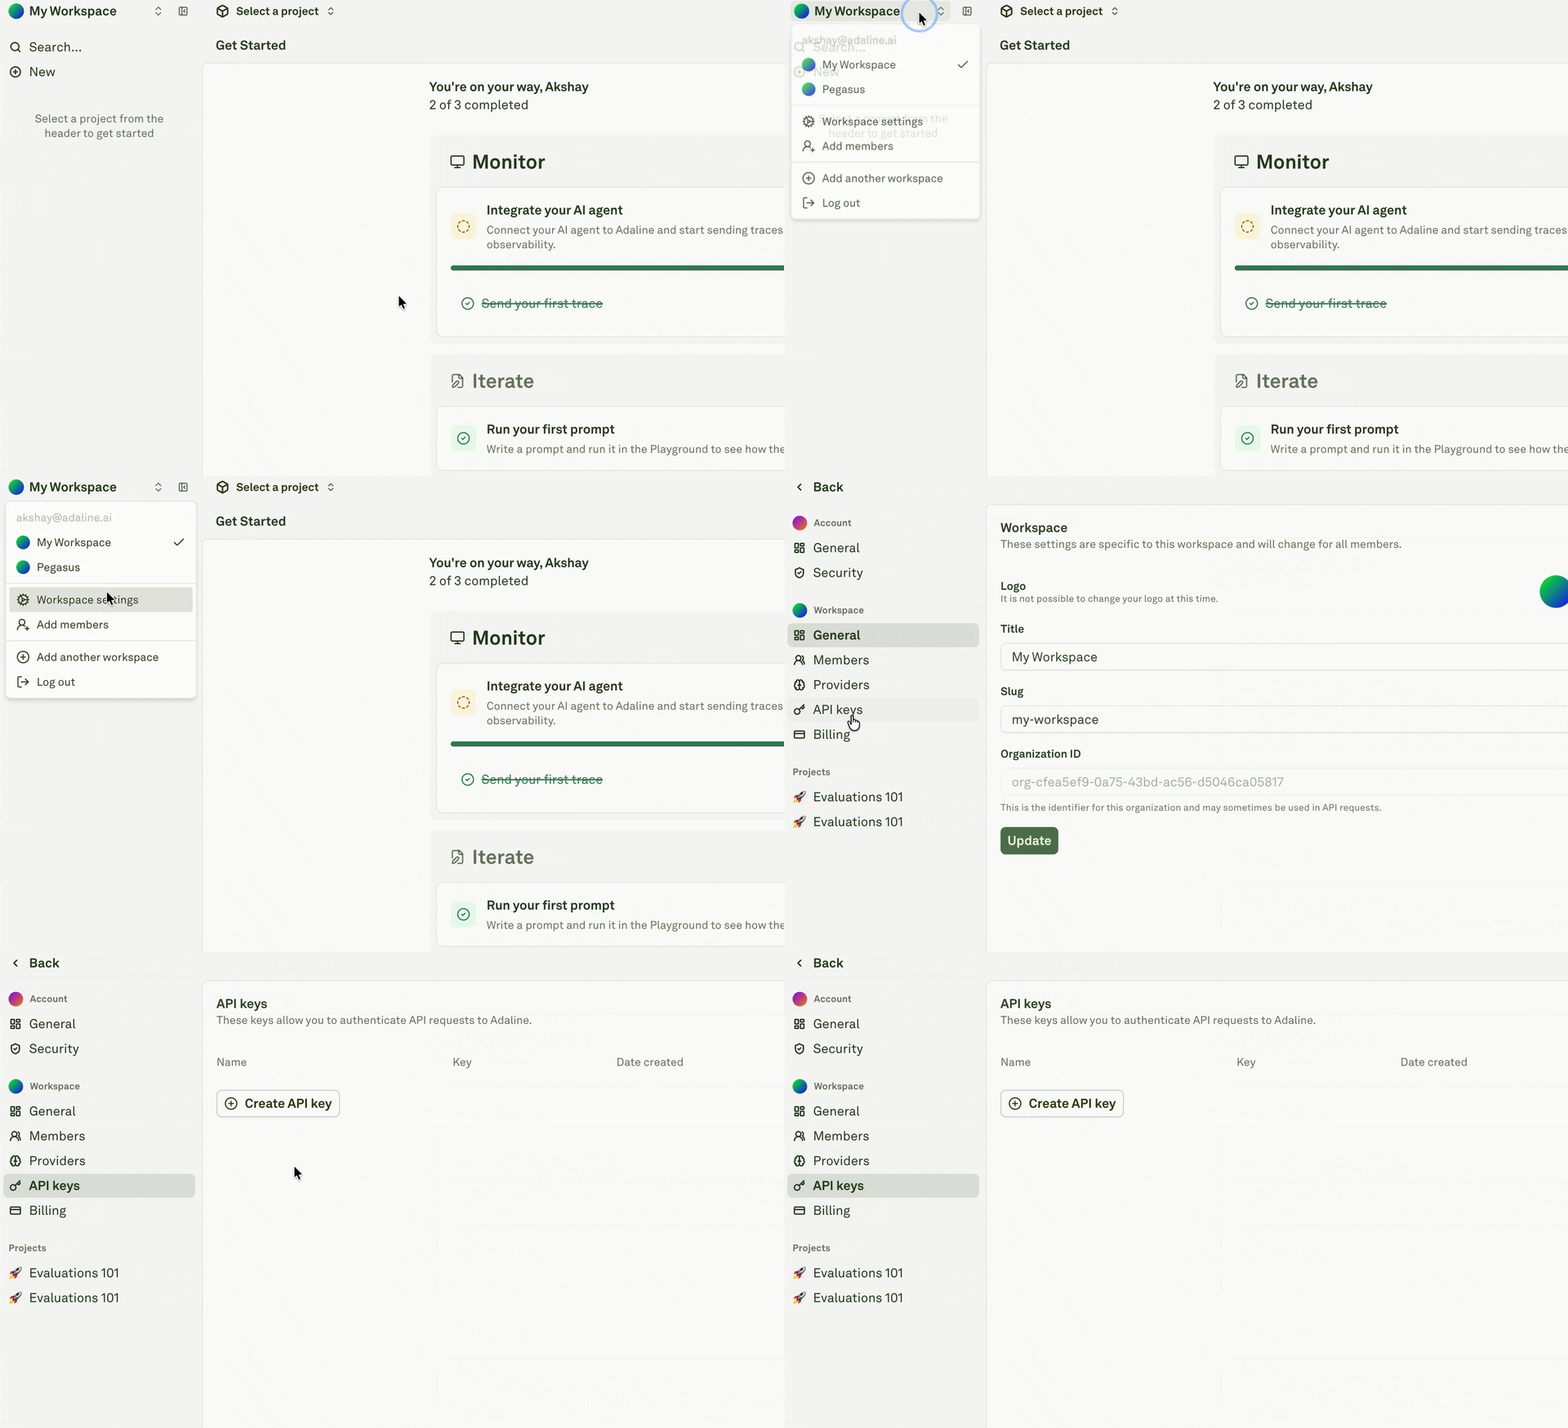
## 2. Set up your workspace API key
Create a workspace API key that your application, SDK, integration, or proxy setup will use to authenticate with Adaline. For the full walkthrough, see [Create API keys](/docs/admin/create-api-keys).
 ## 3. Integrate your AI Agent
Choose the integration method that best fits your workflow.
### Let an AI coding agent do it for you
If you use an AI coding agent such as Cursor, Windsurf, Cline, or any other agent that accepts context — you can hand it all the information it needs to integrate Adaline into your codebase automatically.
Open the full integration context document below, then use the **Copy page** button (top-right of the page) or the **ChatGPT** / **Claude** buttons to send it directly to your AI agent.
Use the integration-context pages above when you want an AI coding agent to understand Adaline's SDKs, REST API, authentication model, and logging workflow.
### Use an Adaline integration
If your AI agent already runs on a supported framework, provider SDK, gateway, or OpenTelemetry pipeline, use an Adaline integration. In many cases, you install the Adaline integration package, add your Adaline API key and project ID, and keep your existing agent code mostly unchanged.
This is usually the best first path for LangChain, LangGraph, Vercel AI SDK, LiteLLM, LlamaIndex, DSPy, Pydantic AI, CrewAI, AutoGen, Mastra, OpenTelemetry, and supported AI providers.
```bash theme={null}
# Example: LangChain
npm install @adaline/client @adaline/langchain @langchain/core @langchain/openai
```
```typescript theme={null}
// Add the Adaline integration to the framework or provider client you already use.
// Then run one request and confirm the trace appears in Logs.
```
Choose the right integration path for frameworks, providers, gateways, and OpenTelemetry.
Browse every supported provider and framework integration.
Observe chains, model calls, tools, retrieval, and agent steps.
Capture generateText, streamText, tool calls, and multi-step flows.
Use this path when your app already has a framework lifecycle where Adaline can attach cleanly. Use the SDK or API tab when you need to manually shape custom traces, spans, sessions, or metadata.
### Zero-code integration via the Adaline Proxy
The fastest way to start sending data to Adaline. Instead of calling your AI provider directly, you route requests through Adaline's gateway by changing the base URL. Adaline transparently forwards the request to your provider while recording the full trace — no SDK or additional instrumentation required.
#### Get your Project and Prompt IDs
Before writing any code, grab the identifiers that link your application's traffic to the correct project and prompt in Adaline.
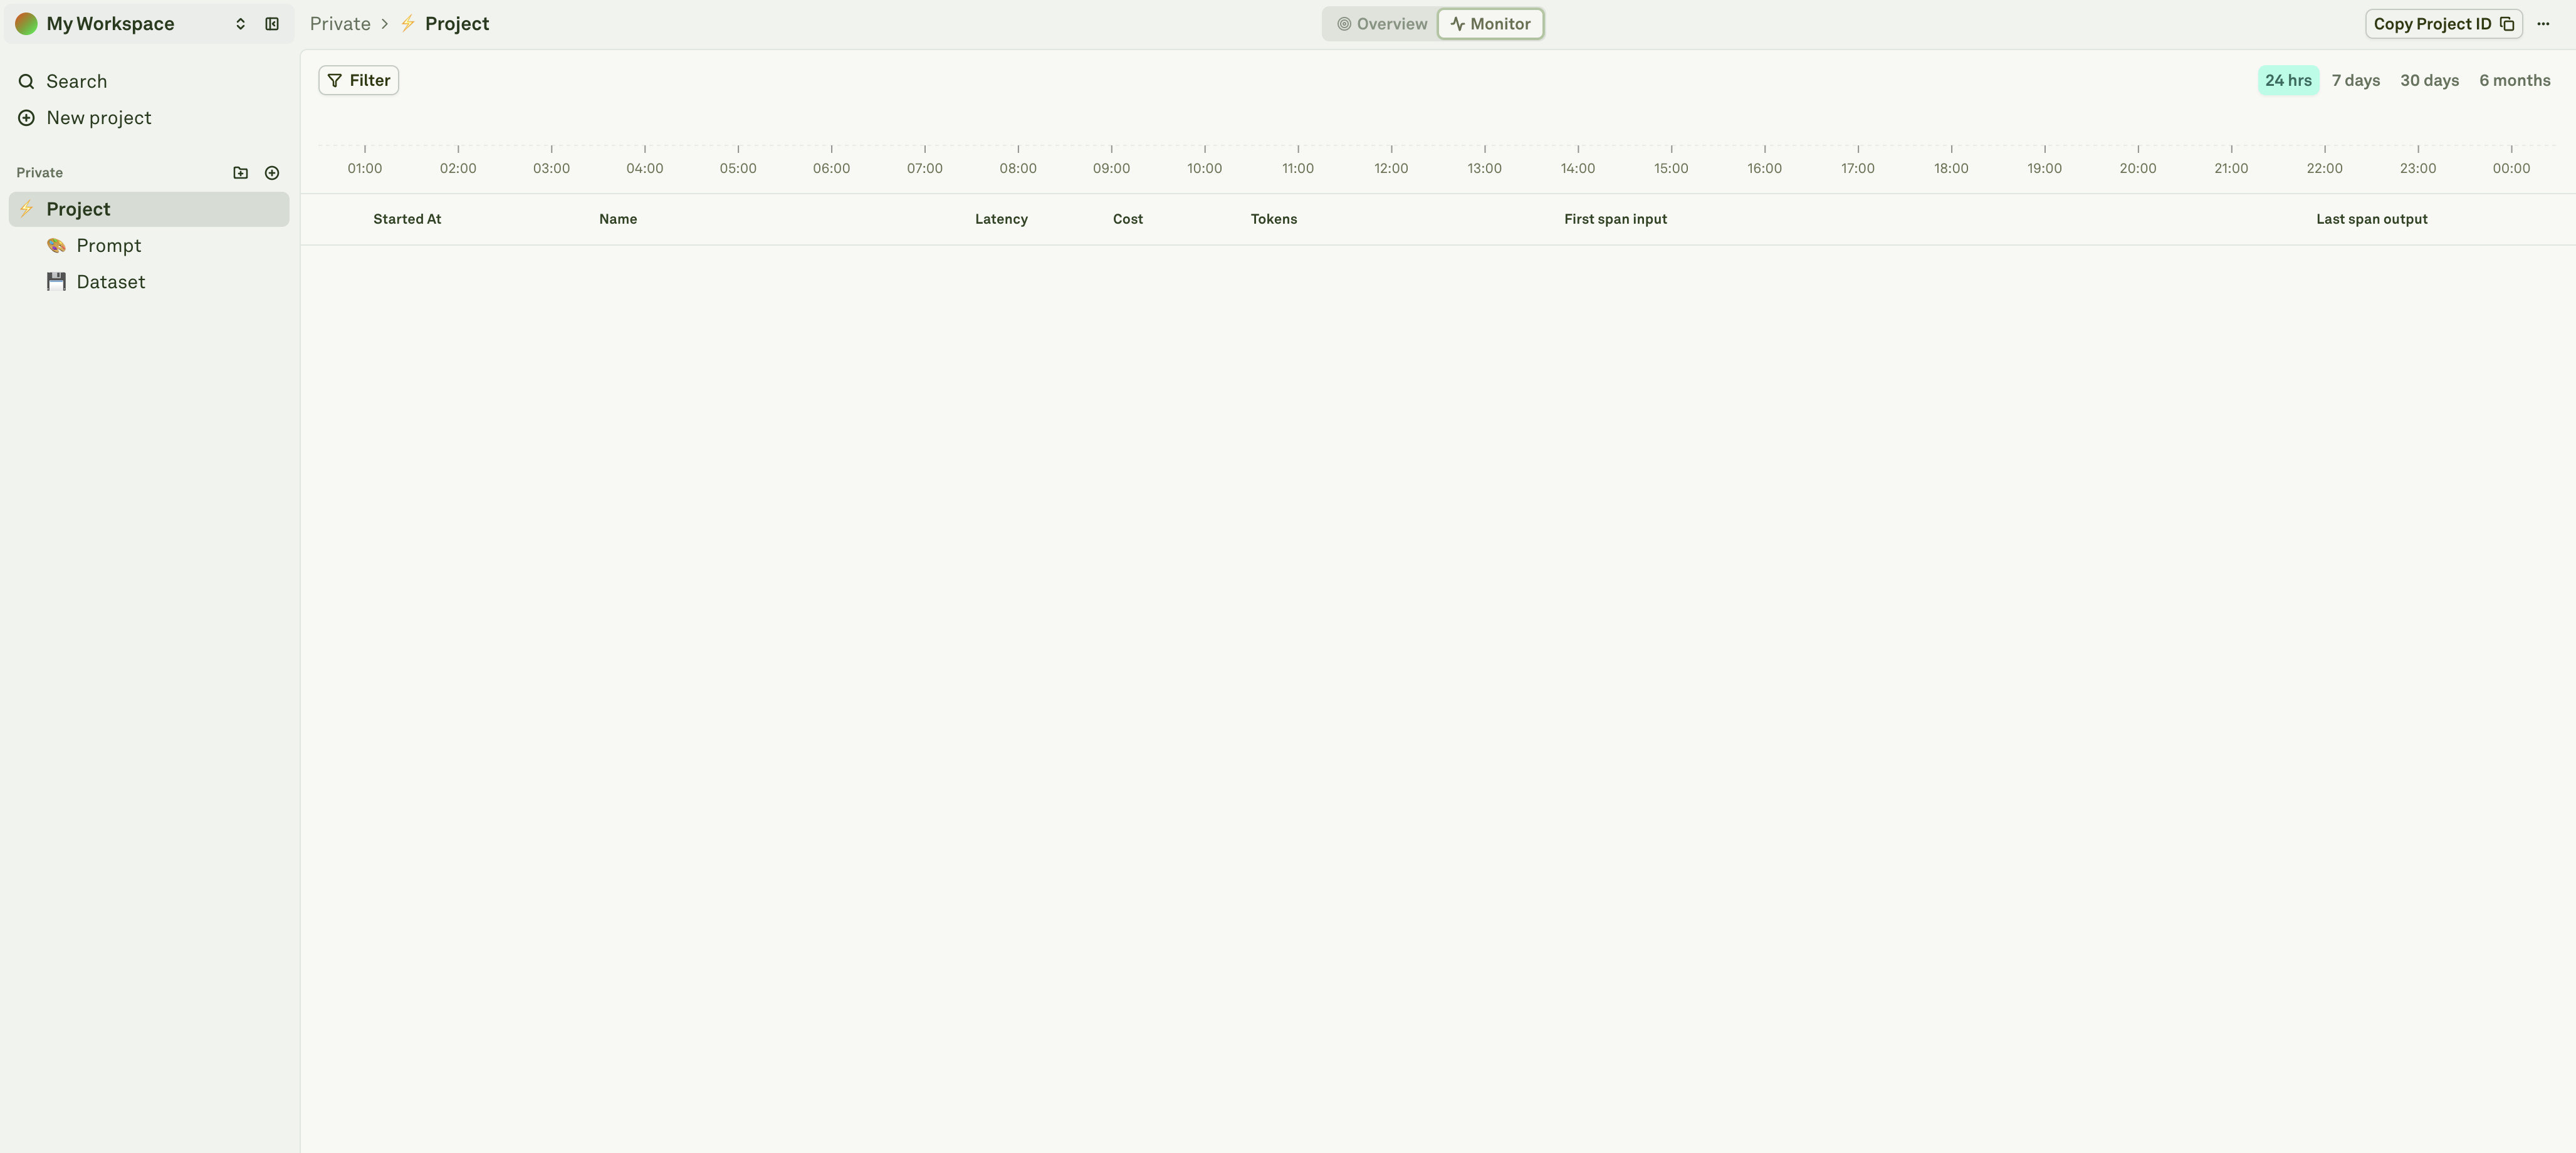
**Copy your Project ID**
* In the sidebar, select your project.
* On the top bar, click on **Monitor**
* On the top right, click on **Copy Project ID**.
## 3. Integrate your AI Agent
Choose the integration method that best fits your workflow.
### Let an AI coding agent do it for you
If you use an AI coding agent such as Cursor, Windsurf, Cline, or any other agent that accepts context — you can hand it all the information it needs to integrate Adaline into your codebase automatically.
Open the full integration context document below, then use the **Copy page** button (top-right of the page) or the **ChatGPT** / **Claude** buttons to send it directly to your AI agent.
Use the integration-context pages above when you want an AI coding agent to understand Adaline's SDKs, REST API, authentication model, and logging workflow.
### Use an Adaline integration
If your AI agent already runs on a supported framework, provider SDK, gateway, or OpenTelemetry pipeline, use an Adaline integration. In many cases, you install the Adaline integration package, add your Adaline API key and project ID, and keep your existing agent code mostly unchanged.
This is usually the best first path for LangChain, LangGraph, Vercel AI SDK, LiteLLM, LlamaIndex, DSPy, Pydantic AI, CrewAI, AutoGen, Mastra, OpenTelemetry, and supported AI providers.
```bash theme={null}
# Example: LangChain
npm install @adaline/client @adaline/langchain @langchain/core @langchain/openai
```
```typescript theme={null}
// Add the Adaline integration to the framework or provider client you already use.
// Then run one request and confirm the trace appears in Logs.
```
Choose the right integration path for frameworks, providers, gateways, and OpenTelemetry.
Browse every supported provider and framework integration.
Observe chains, model calls, tools, retrieval, and agent steps.
Capture generateText, streamText, tool calls, and multi-step flows.
Use this path when your app already has a framework lifecycle where Adaline can attach cleanly. Use the SDK or API tab when you need to manually shape custom traces, spans, sessions, or metadata.
### Zero-code integration via the Adaline Proxy
The fastest way to start sending data to Adaline. Instead of calling your AI provider directly, you route requests through Adaline's gateway by changing the base URL. Adaline transparently forwards the request to your provider while recording the full trace — no SDK or additional instrumentation required.
#### Get your Project and Prompt IDs
Before writing any code, grab the identifiers that link your application's traffic to the correct project and prompt in Adaline.
**Copy your Project ID**
* In the sidebar, select your project.
* On the top bar, click on **Monitor**
* On the top right, click on **Copy Project ID**.
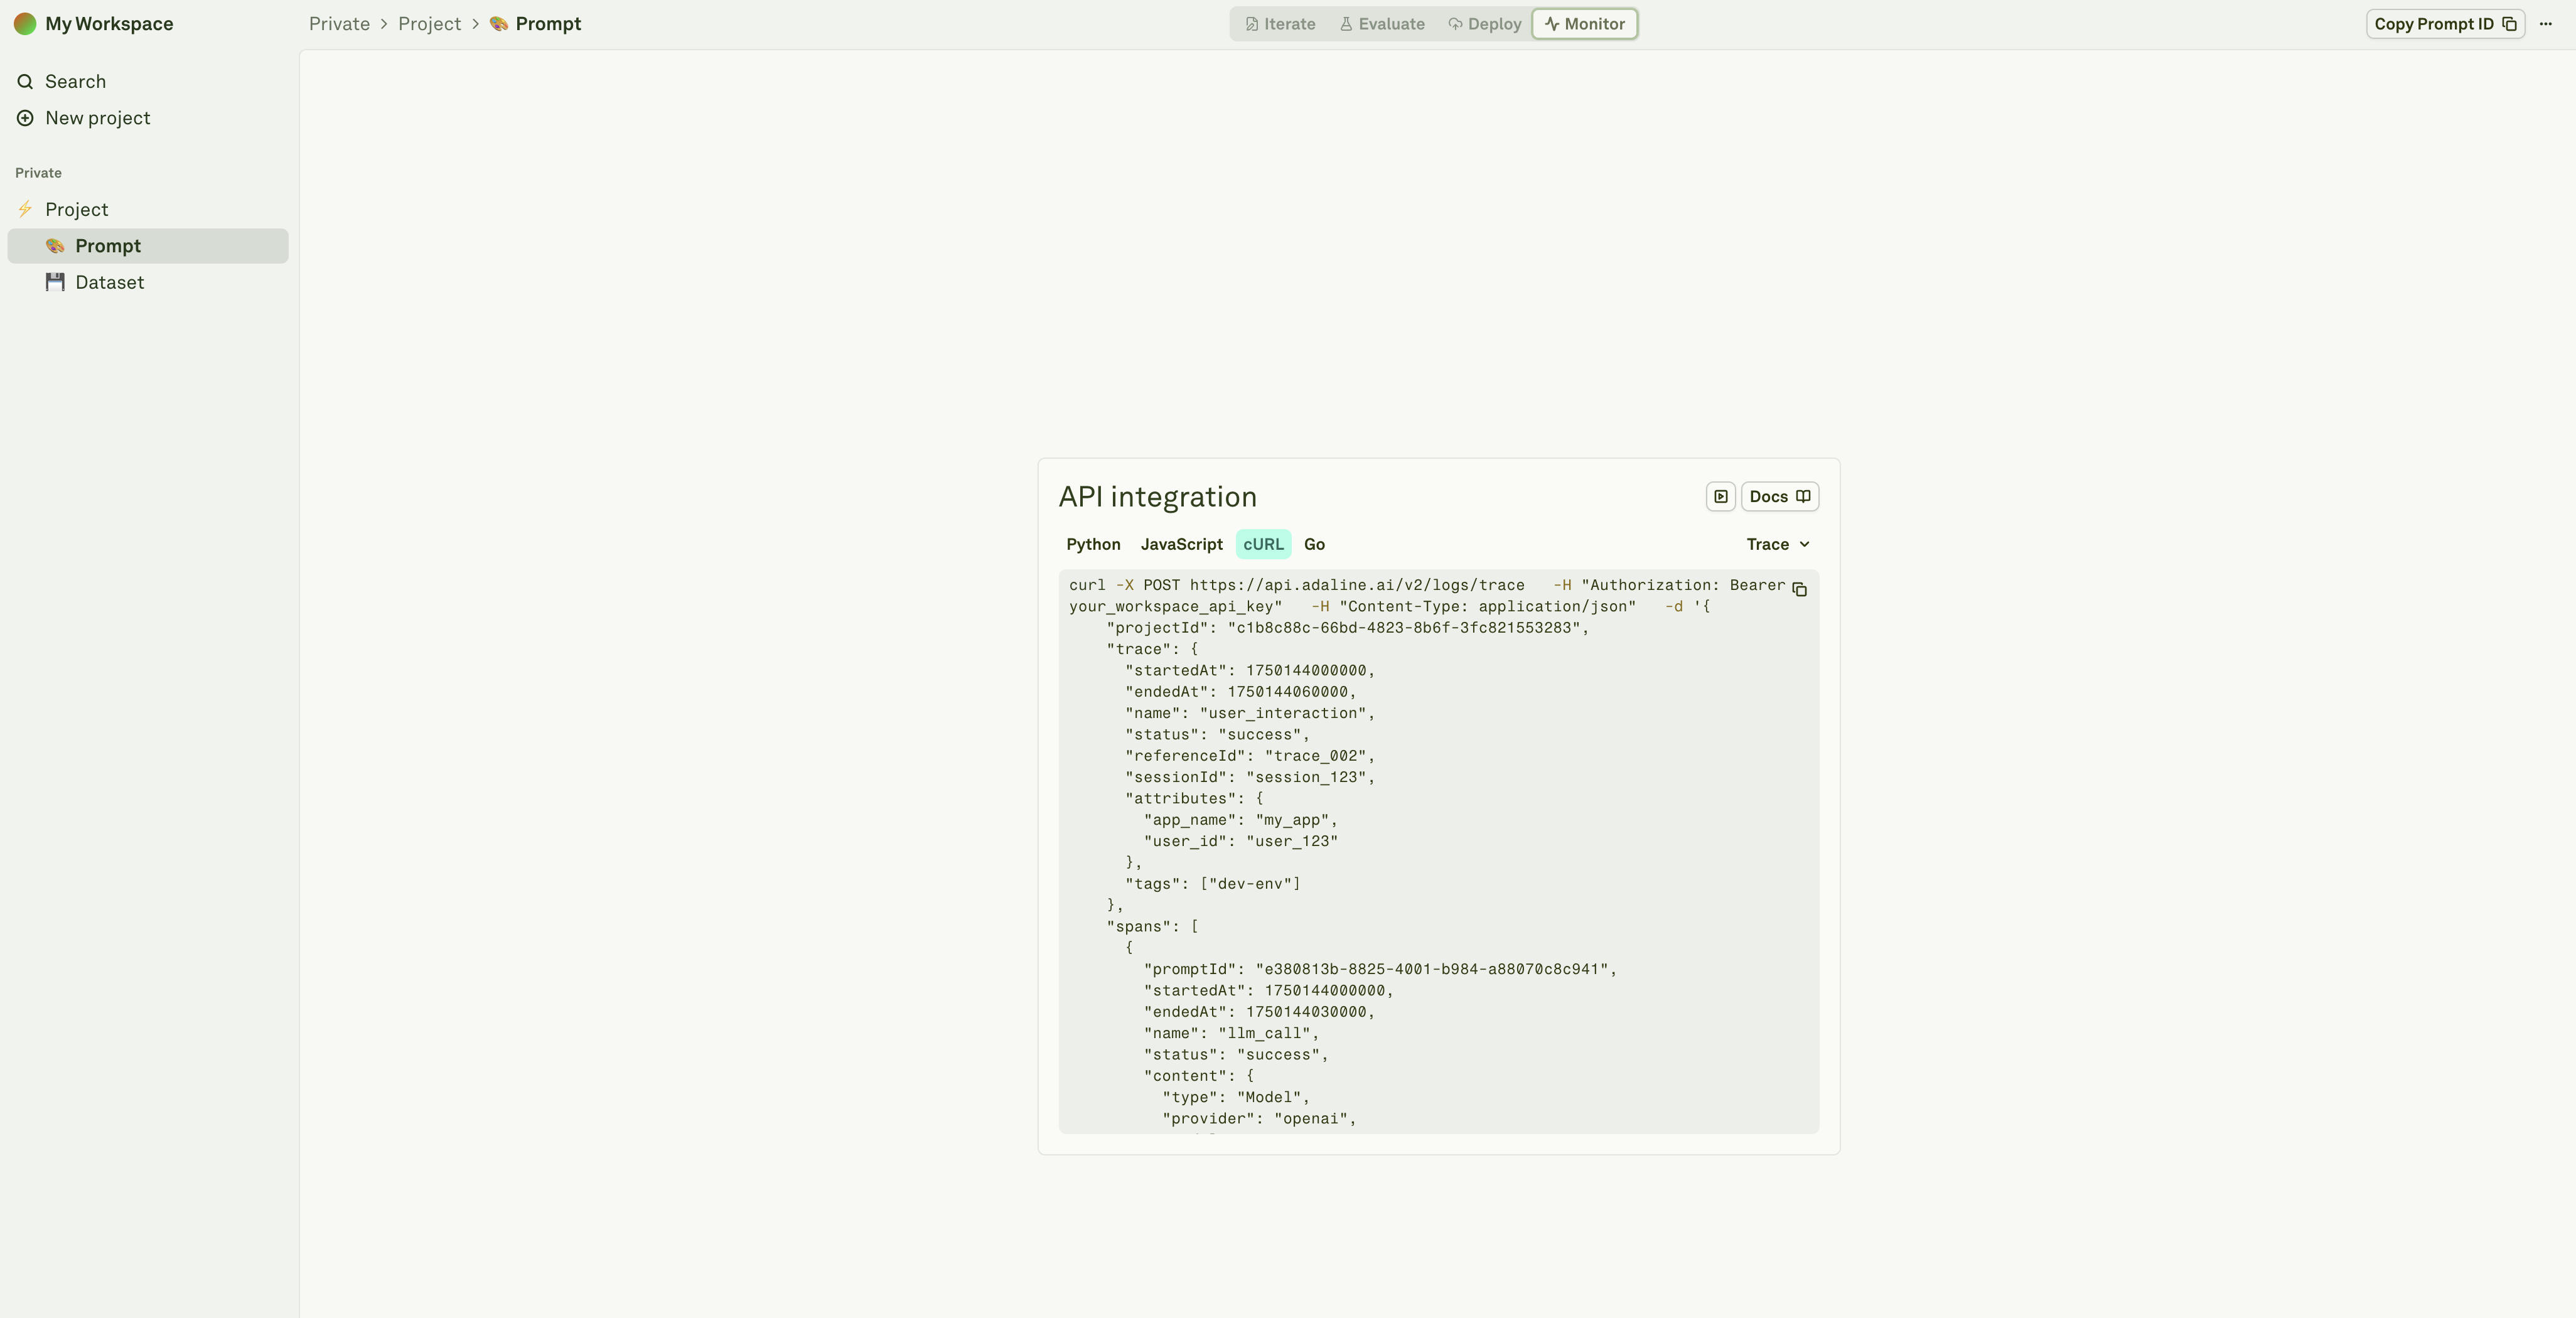
 **Copy your Prompt ID(s)**
* In the sidebar, select your prompt.
* On the top bar, click on **Monitor**
* On the top right, click on **Copy Prompt ID**.
**Copy your Prompt ID(s)**
* In the sidebar, select your prompt.
* On the top bar, click on **Monitor**
* On the top right, click on **Copy Prompt ID**.
 Repeat this for each prompt you want to monitor.
#### Supported providers
Change your base URL to the corresponding Adaline gateway endpoint for your provider:
| Provider | Base URL |
| -------------- | -------------------------------------------- |
| OpenAI | `https://gateway.adaline.ai/v1/openai/` |
| Anthropic | `https://gateway.adaline.ai/v1/anthropic/` |
| Google | `https://gateway.adaline.ai/v1/google` |
| Azure | `https://gateway.adaline.ai/v1/azure/` |
| Amazon Bedrock | `https://gateway.adaline.ai/v1/bedrock/` |
| Groq | `https://gateway.adaline.ai/v1/groq/` |
| Open Router | `https://gateway.adaline.ai/v1/open-router/` |
| Together AI | `https://gateway.adaline.ai/v1/together-ai/` |
| xAI | `https://gateway.adaline.ai/v1/xai/` |
| Vertex AI | `https://gateway.adaline.ai/v1/vertex` |
#### Code examples
Below are minimal examples showing how to route requests through the proxy. Replace the placeholder values with your actual credentials and IDs.
```typescript theme={null}
import OpenAI from "openai";
const client = new OpenAI({
apiKey: process.env.OPENAI_API_KEY,
baseURL: "https://gateway.adaline.ai/v1/openai/",
defaultHeaders: {
"adaline-api-key": process.env.ADALINE_API_KEY,
"adaline-project-id": process.env.ADALINE_PROJECT_ID,
"adaline-prompt-id": process.env.ADALINE_PROMPT_ID,
},
});
// First prompt — classify intent
const classification = await client.chat.completions.create({
model: "gpt-4o-mini",
messages: [
{
role: "system",
content:
"Classify the user's intent as one of: greeting, question, complaint, feedback.",
},
{ role: "user", content: "My order hasn't arrived in three days." },
],
});
console.log("Intent:", classification.choices[0].message.content);
// Second prompt — generate reply
const reply = await client.chat.completions.create({
model: "gpt-4o-mini",
messages: [
{
role: "system",
content: `You are a support assistant. The user's intent is: ${classification.choices[0].message.content}. Respond helpfully.`,
},
{ role: "user", content: "My order hasn't arrived in three days." },
],
});
console.log("Reply:", reply.choices[0].message.content);
```
```python theme={null}
import os
from openai import OpenAI
client = OpenAI(
api_key=os.getenv("OPENAI_API_KEY"),
base_url="https://gateway.adaline.ai/v1/openai/",
)
headers = {
"adaline-api-key": os.getenv("ADALINE_API_KEY"),
"adaline-project-id": os.getenv("ADALINE_PROJECT_ID"),
"adaline-prompt-id": os.getenv("ADALINE_PROMPT_ID"),
}
# First prompt — classify intent
classification = client.chat.completions.create(
model="gpt-4o-mini",
messages=[
{
"role": "system",
"content": "Classify the user's intent as one of: greeting, question, complaint, feedback.",
},
{"role": "user", "content": "My order hasn't arrived in three days."},
],
extra_headers=headers,
)
intent = classification.choices[0].message.content
print("Intent:", intent)
# Second prompt — generate reply
reply = client.chat.completions.create(
model="gpt-4o-mini",
messages=[
{
"role": "system",
"content": f"You are a support assistant. The user's intent is: {intent}. Respond helpfully.",
},
{"role": "user", "content": "My order hasn't arrived in three days."},
],
extra_headers=headers,
)
print("Reply:", reply.choices[0].message.content)
```
```python theme={null}
import os
from anthropic import Anthropic
client = Anthropic(
api_key=os.getenv("ANTHROPIC_API_KEY"),
base_url="https://gateway.adaline.ai/v1/anthropic/",
default_headers={
"adaline-api-key": os.getenv("ADALINE_API_KEY"),
"adaline-project-id": os.getenv("ADALINE_PROJECT_ID"),
"adaline-prompt-id": os.getenv("ADALINE_PROMPT_ID"),
},
)
# First prompt — classify intent
classification = client.messages.create(
model="claude-sonnet-4-20250514",
max_tokens=256,
messages=[
{"role": "user", "content": "Classify this intent as greeting, question, complaint, or feedback: 'My order hasn't arrived in three days.'"},
],
)
intent = classification.content[0].text
print("Intent:", intent)
# Second prompt — generate reply
reply = client.messages.create(
model="claude-sonnet-4-20250514",
max_tokens=1024,
messages=[
{"role": "user", "content": f"You are a support assistant. The user's intent is: {intent}. Respond helpfully to: 'My order hasn't arrived in three days.'"},
],
)
print("Reply:", reply.content[0].text)
```
Run your application. Both requests are automatically routed through Adaline's gateway, and traces appear in the dashboard within seconds.
### Full control via SDK or API
Use the Adaline SDK (TypeScript or Python) or the REST API directly for complete control over how traces and spans are structured. This approach lets you capture any operation — LLM calls, tool executions, retrievals, and custom functions.
#### Get your Project and Prompt IDs
**Copy your Project ID**
* In the sidebar, select your project.
* On the top bar, click on **Monitor**
* On the top right, click on **Copy Project ID**.
**Copy your Prompt ID(s)**
* In the sidebar, select your prompt.
* On the top bar, click on **Monitor**
* On the top right, click on **Copy Prompt ID**.
Repeat this for each prompt you want to monitor.
#### Install
```bash theme={null}
npm install @adaline/client
```
```bash theme={null}
pip install adaline-client
```
#### Create a trace and log spans
The following example creates a trace with two spans — simulating a simple AI application that classifies a user's intent and then generates a reply.
```typescript theme={null}
import { Adaline } from "@adaline/client";
import OpenAI from "openai";
const adaline = new Adaline({ apiKey: process.env.ADALINE_API_KEY });
const monitor = adaline.initMonitor({ projectId: "your-project-id" });
const openai = new OpenAI();
// Start a trace for this request
const trace = monitor.logTrace({ name: "support-request" });
// Span 1 — classify intent
const classifySpan = trace.logSpan({
name: "classify-intent",
promptId: "your-classify-prompt-id",
});
const classification = await openai.chat.completions.create({
model: "gpt-4o-mini",
messages: [
{ role: "system", content: "Classify the intent as: greeting, question, complaint, feedback." },
{ role: "user", content: "My order hasn't arrived in three days." },
],
});
classifySpan.update({
status: "success",
content: {
type: "Model",
provider: "openai",
model: "gpt-4o-mini",
input: JSON.stringify({ messages: [{ role: "user", content: "My order hasn't arrived in three days." }] }),
output: JSON.stringify(classification),
},
});
classifySpan.end();
// Span 2 — generate reply
const replySpan = trace.logSpan({
name: "generate-reply",
promptId: "your-reply-prompt-id",
});
const reply = await openai.chat.completions.create({
model: "gpt-4o-mini",
messages: [
{ role: "system", content: `You are a support assistant. Intent: ${classification.choices[0].message.content}` },
{ role: "user", content: "My order hasn't arrived in three days." },
],
});
replySpan.update({
status: "success",
content: {
type: "Model",
provider: "openai",
model: "gpt-4o-mini",
input: JSON.stringify({ messages: [{ role: "user", content: "My order hasn't arrived in three days." }] }),
output: JSON.stringify(reply),
},
});
replySpan.end();
// End the trace and flush
trace.update({ status: "success" });
trace.end();
await monitor.flush();
monitor.stop();
```
```python theme={null}
import os, json, asyncio
from adaline.main import Adaline
from openai import AsyncOpenAI
from adaline_api.models.log_span_content import LogSpanContent
from adaline_api.models.log_span_model_content import LogSpanModelContent
adaline = Adaline(api_key=os.getenv("ADALINE_API_KEY"))
monitor = adaline.init_monitor(project_id="your-project-id")
openai_client = AsyncOpenAI()
# Start a trace for this request
trace = monitor.log_trace(name="support-request")
# Span 1 — classify intent
classify_span = trace.log_span(
name="classify-intent",
prompt_id="your-classify-prompt-id",
)
classification = await openai_client.chat.completions.create(
model="gpt-4o-mini",
messages=[
{"role": "system", "content": "Classify the intent as: greeting, question, complaint, feedback."},
{"role": "user", "content": "My order hasn't arrived in three days."},
],
)
classify_span.update({
"status": "success",
"content": LogSpanContent(
actual_instance=LogSpanModelContent(
type="Model",
provider="openai",
model="gpt-4o-mini",
input=json.dumps({"messages": [{"role": "user", "content": "My order hasn't arrived in three days."}]}),
output=json.dumps(classification.model_dump()),
)
),
})
classify_span.end()
# Span 2 — generate reply
reply_span = trace.log_span(
name="generate-reply",
prompt_id="your-reply-prompt-id",
)
intent = classification.choices[0].message.content
reply = await openai_client.chat.completions.create(
model="gpt-4o-mini",
messages=[
{"role": "system", "content": f"You are a support assistant. Intent: {intent}"},
{"role": "user", "content": "My order hasn't arrived in three days."},
],
)
reply_span.update({
"status": "success",
"content": LogSpanContent(
actual_instance=LogSpanModelContent(
type="Model",
provider="openai",
model="gpt-4o-mini",
input=json.dumps({"messages": [{"role": "user", "content": "My order hasn't arrived in three days."}]}),
output=json.dumps(reply.model_dump()),
)
),
})
reply_span.end()
# End the trace and flush
trace.update({"status": "success"})
trace.end()
await monitor.flush()
monitor.stop()
```
```bash theme={null}
# Create a trace
curl -X POST https://api.adaline.ai/v2/logs/trace \
-H "Authorization: Bearer $ADALINE_API_KEY" \
-H "Content-Type: application/json" \
-d '{
"projectId": "your-project-id",
"name": "support-request",
"status": "success"
}'
# Create a span within the trace
curl -X POST https://api.adaline.ai/v2/logs/span \
-H "Authorization: Bearer $ADALINE_API_KEY" \
-H "Content-Type: application/json" \
-d '{
"traceId": "",
"promptId": "your-prompt-id",
"name": "classify-intent",
"status": "success",
"content": {
"type": "Model",
"provider": "openai",
"model": "gpt-4o-mini",
"input": "{\"messages\":[{\"role\":\"user\",\"content\":\"My order hasn't arrived.\"}]}",
"output": "{\"choices\":[{\"message\":{\"content\":\"complaint\"}}]}"
}
}'
```
Run your application. Each trace and its spans will appear in the Adaline dashboard within seconds.
## 4. View your Traces and Spans
Regardless of which integration method you chose, the dashboard experience is the same.
Select your **Project**, then click **Traces** in the sidebar. You will see a list of traces — one for each request your application made.
Repeat this for each prompt you want to monitor.
#### Supported providers
Change your base URL to the corresponding Adaline gateway endpoint for your provider:
| Provider | Base URL |
| -------------- | -------------------------------------------- |
| OpenAI | `https://gateway.adaline.ai/v1/openai/` |
| Anthropic | `https://gateway.adaline.ai/v1/anthropic/` |
| Google | `https://gateway.adaline.ai/v1/google` |
| Azure | `https://gateway.adaline.ai/v1/azure/` |
| Amazon Bedrock | `https://gateway.adaline.ai/v1/bedrock/` |
| Groq | `https://gateway.adaline.ai/v1/groq/` |
| Open Router | `https://gateway.adaline.ai/v1/open-router/` |
| Together AI | `https://gateway.adaline.ai/v1/together-ai/` |
| xAI | `https://gateway.adaline.ai/v1/xai/` |
| Vertex AI | `https://gateway.adaline.ai/v1/vertex` |
#### Code examples
Below are minimal examples showing how to route requests through the proxy. Replace the placeholder values with your actual credentials and IDs.
```typescript theme={null}
import OpenAI from "openai";
const client = new OpenAI({
apiKey: process.env.OPENAI_API_KEY,
baseURL: "https://gateway.adaline.ai/v1/openai/",
defaultHeaders: {
"adaline-api-key": process.env.ADALINE_API_KEY,
"adaline-project-id": process.env.ADALINE_PROJECT_ID,
"adaline-prompt-id": process.env.ADALINE_PROMPT_ID,
},
});
// First prompt — classify intent
const classification = await client.chat.completions.create({
model: "gpt-4o-mini",
messages: [
{
role: "system",
content:
"Classify the user's intent as one of: greeting, question, complaint, feedback.",
},
{ role: "user", content: "My order hasn't arrived in three days." },
],
});
console.log("Intent:", classification.choices[0].message.content);
// Second prompt — generate reply
const reply = await client.chat.completions.create({
model: "gpt-4o-mini",
messages: [
{
role: "system",
content: `You are a support assistant. The user's intent is: ${classification.choices[0].message.content}. Respond helpfully.`,
},
{ role: "user", content: "My order hasn't arrived in three days." },
],
});
console.log("Reply:", reply.choices[0].message.content);
```
```python theme={null}
import os
from openai import OpenAI
client = OpenAI(
api_key=os.getenv("OPENAI_API_KEY"),
base_url="https://gateway.adaline.ai/v1/openai/",
)
headers = {
"adaline-api-key": os.getenv("ADALINE_API_KEY"),
"adaline-project-id": os.getenv("ADALINE_PROJECT_ID"),
"adaline-prompt-id": os.getenv("ADALINE_PROMPT_ID"),
}
# First prompt — classify intent
classification = client.chat.completions.create(
model="gpt-4o-mini",
messages=[
{
"role": "system",
"content": "Classify the user's intent as one of: greeting, question, complaint, feedback.",
},
{"role": "user", "content": "My order hasn't arrived in three days."},
],
extra_headers=headers,
)
intent = classification.choices[0].message.content
print("Intent:", intent)
# Second prompt — generate reply
reply = client.chat.completions.create(
model="gpt-4o-mini",
messages=[
{
"role": "system",
"content": f"You are a support assistant. The user's intent is: {intent}. Respond helpfully.",
},
{"role": "user", "content": "My order hasn't arrived in three days."},
],
extra_headers=headers,
)
print("Reply:", reply.choices[0].message.content)
```
```python theme={null}
import os
from anthropic import Anthropic
client = Anthropic(
api_key=os.getenv("ANTHROPIC_API_KEY"),
base_url="https://gateway.adaline.ai/v1/anthropic/",
default_headers={
"adaline-api-key": os.getenv("ADALINE_API_KEY"),
"adaline-project-id": os.getenv("ADALINE_PROJECT_ID"),
"adaline-prompt-id": os.getenv("ADALINE_PROMPT_ID"),
},
)
# First prompt — classify intent
classification = client.messages.create(
model="claude-sonnet-4-20250514",
max_tokens=256,
messages=[
{"role": "user", "content": "Classify this intent as greeting, question, complaint, or feedback: 'My order hasn't arrived in three days.'"},
],
)
intent = classification.content[0].text
print("Intent:", intent)
# Second prompt — generate reply
reply = client.messages.create(
model="claude-sonnet-4-20250514",
max_tokens=1024,
messages=[
{"role": "user", "content": f"You are a support assistant. The user's intent is: {intent}. Respond helpfully to: 'My order hasn't arrived in three days.'"},
],
)
print("Reply:", reply.content[0].text)
```
Run your application. Both requests are automatically routed through Adaline's gateway, and traces appear in the dashboard within seconds.
### Full control via SDK or API
Use the Adaline SDK (TypeScript or Python) or the REST API directly for complete control over how traces and spans are structured. This approach lets you capture any operation — LLM calls, tool executions, retrievals, and custom functions.
#### Get your Project and Prompt IDs
**Copy your Project ID**
* In the sidebar, select your project.
* On the top bar, click on **Monitor**
* On the top right, click on **Copy Project ID**.
**Copy your Prompt ID(s)**
* In the sidebar, select your prompt.
* On the top bar, click on **Monitor**
* On the top right, click on **Copy Prompt ID**.
Repeat this for each prompt you want to monitor.
#### Install
```bash theme={null}
npm install @adaline/client
```
```bash theme={null}
pip install adaline-client
```
#### Create a trace and log spans
The following example creates a trace with two spans — simulating a simple AI application that classifies a user's intent and then generates a reply.
```typescript theme={null}
import { Adaline } from "@adaline/client";
import OpenAI from "openai";
const adaline = new Adaline({ apiKey: process.env.ADALINE_API_KEY });
const monitor = adaline.initMonitor({ projectId: "your-project-id" });
const openai = new OpenAI();
// Start a trace for this request
const trace = monitor.logTrace({ name: "support-request" });
// Span 1 — classify intent
const classifySpan = trace.logSpan({
name: "classify-intent",
promptId: "your-classify-prompt-id",
});
const classification = await openai.chat.completions.create({
model: "gpt-4o-mini",
messages: [
{ role: "system", content: "Classify the intent as: greeting, question, complaint, feedback." },
{ role: "user", content: "My order hasn't arrived in three days." },
],
});
classifySpan.update({
status: "success",
content: {
type: "Model",
provider: "openai",
model: "gpt-4o-mini",
input: JSON.stringify({ messages: [{ role: "user", content: "My order hasn't arrived in three days." }] }),
output: JSON.stringify(classification),
},
});
classifySpan.end();
// Span 2 — generate reply
const replySpan = trace.logSpan({
name: "generate-reply",
promptId: "your-reply-prompt-id",
});
const reply = await openai.chat.completions.create({
model: "gpt-4o-mini",
messages: [
{ role: "system", content: `You are a support assistant. Intent: ${classification.choices[0].message.content}` },
{ role: "user", content: "My order hasn't arrived in three days." },
],
});
replySpan.update({
status: "success",
content: {
type: "Model",
provider: "openai",
model: "gpt-4o-mini",
input: JSON.stringify({ messages: [{ role: "user", content: "My order hasn't arrived in three days." }] }),
output: JSON.stringify(reply),
},
});
replySpan.end();
// End the trace and flush
trace.update({ status: "success" });
trace.end();
await monitor.flush();
monitor.stop();
```
```python theme={null}
import os, json, asyncio
from adaline.main import Adaline
from openai import AsyncOpenAI
from adaline_api.models.log_span_content import LogSpanContent
from adaline_api.models.log_span_model_content import LogSpanModelContent
adaline = Adaline(api_key=os.getenv("ADALINE_API_KEY"))
monitor = adaline.init_monitor(project_id="your-project-id")
openai_client = AsyncOpenAI()
# Start a trace for this request
trace = monitor.log_trace(name="support-request")
# Span 1 — classify intent
classify_span = trace.log_span(
name="classify-intent",
prompt_id="your-classify-prompt-id",
)
classification = await openai_client.chat.completions.create(
model="gpt-4o-mini",
messages=[
{"role": "system", "content": "Classify the intent as: greeting, question, complaint, feedback."},
{"role": "user", "content": "My order hasn't arrived in three days."},
],
)
classify_span.update({
"status": "success",
"content": LogSpanContent(
actual_instance=LogSpanModelContent(
type="Model",
provider="openai",
model="gpt-4o-mini",
input=json.dumps({"messages": [{"role": "user", "content": "My order hasn't arrived in three days."}]}),
output=json.dumps(classification.model_dump()),
)
),
})
classify_span.end()
# Span 2 — generate reply
reply_span = trace.log_span(
name="generate-reply",
prompt_id="your-reply-prompt-id",
)
intent = classification.choices[0].message.content
reply = await openai_client.chat.completions.create(
model="gpt-4o-mini",
messages=[
{"role": "system", "content": f"You are a support assistant. Intent: {intent}"},
{"role": "user", "content": "My order hasn't arrived in three days."},
],
)
reply_span.update({
"status": "success",
"content": LogSpanContent(
actual_instance=LogSpanModelContent(
type="Model",
provider="openai",
model="gpt-4o-mini",
input=json.dumps({"messages": [{"role": "user", "content": "My order hasn't arrived in three days."}]}),
output=json.dumps(reply.model_dump()),
)
),
})
reply_span.end()
# End the trace and flush
trace.update({"status": "success"})
trace.end()
await monitor.flush()
monitor.stop()
```
```bash theme={null}
# Create a trace
curl -X POST https://api.adaline.ai/v2/logs/trace \
-H "Authorization: Bearer $ADALINE_API_KEY" \
-H "Content-Type: application/json" \
-d '{
"projectId": "your-project-id",
"name": "support-request",
"status": "success"
}'
# Create a span within the trace
curl -X POST https://api.adaline.ai/v2/logs/span \
-H "Authorization: Bearer $ADALINE_API_KEY" \
-H "Content-Type: application/json" \
-d '{
"traceId": "",
"promptId": "your-prompt-id",
"name": "classify-intent",
"status": "success",
"content": {
"type": "Model",
"provider": "openai",
"model": "gpt-4o-mini",
"input": "{\"messages\":[{\"role\":\"user\",\"content\":\"My order hasn't arrived.\"}]}",
"output": "{\"choices\":[{\"message\":{\"content\":\"complaint\"}}]}"
}
}'
```
Run your application. Each trace and its spans will appear in the Adaline dashboard within seconds.
## 4. View your Traces and Spans
Regardless of which integration method you chose, the dashboard experience is the same.
Select your **Project**, then click **Traces** in the sidebar. You will see a list of traces — one for each request your application made.
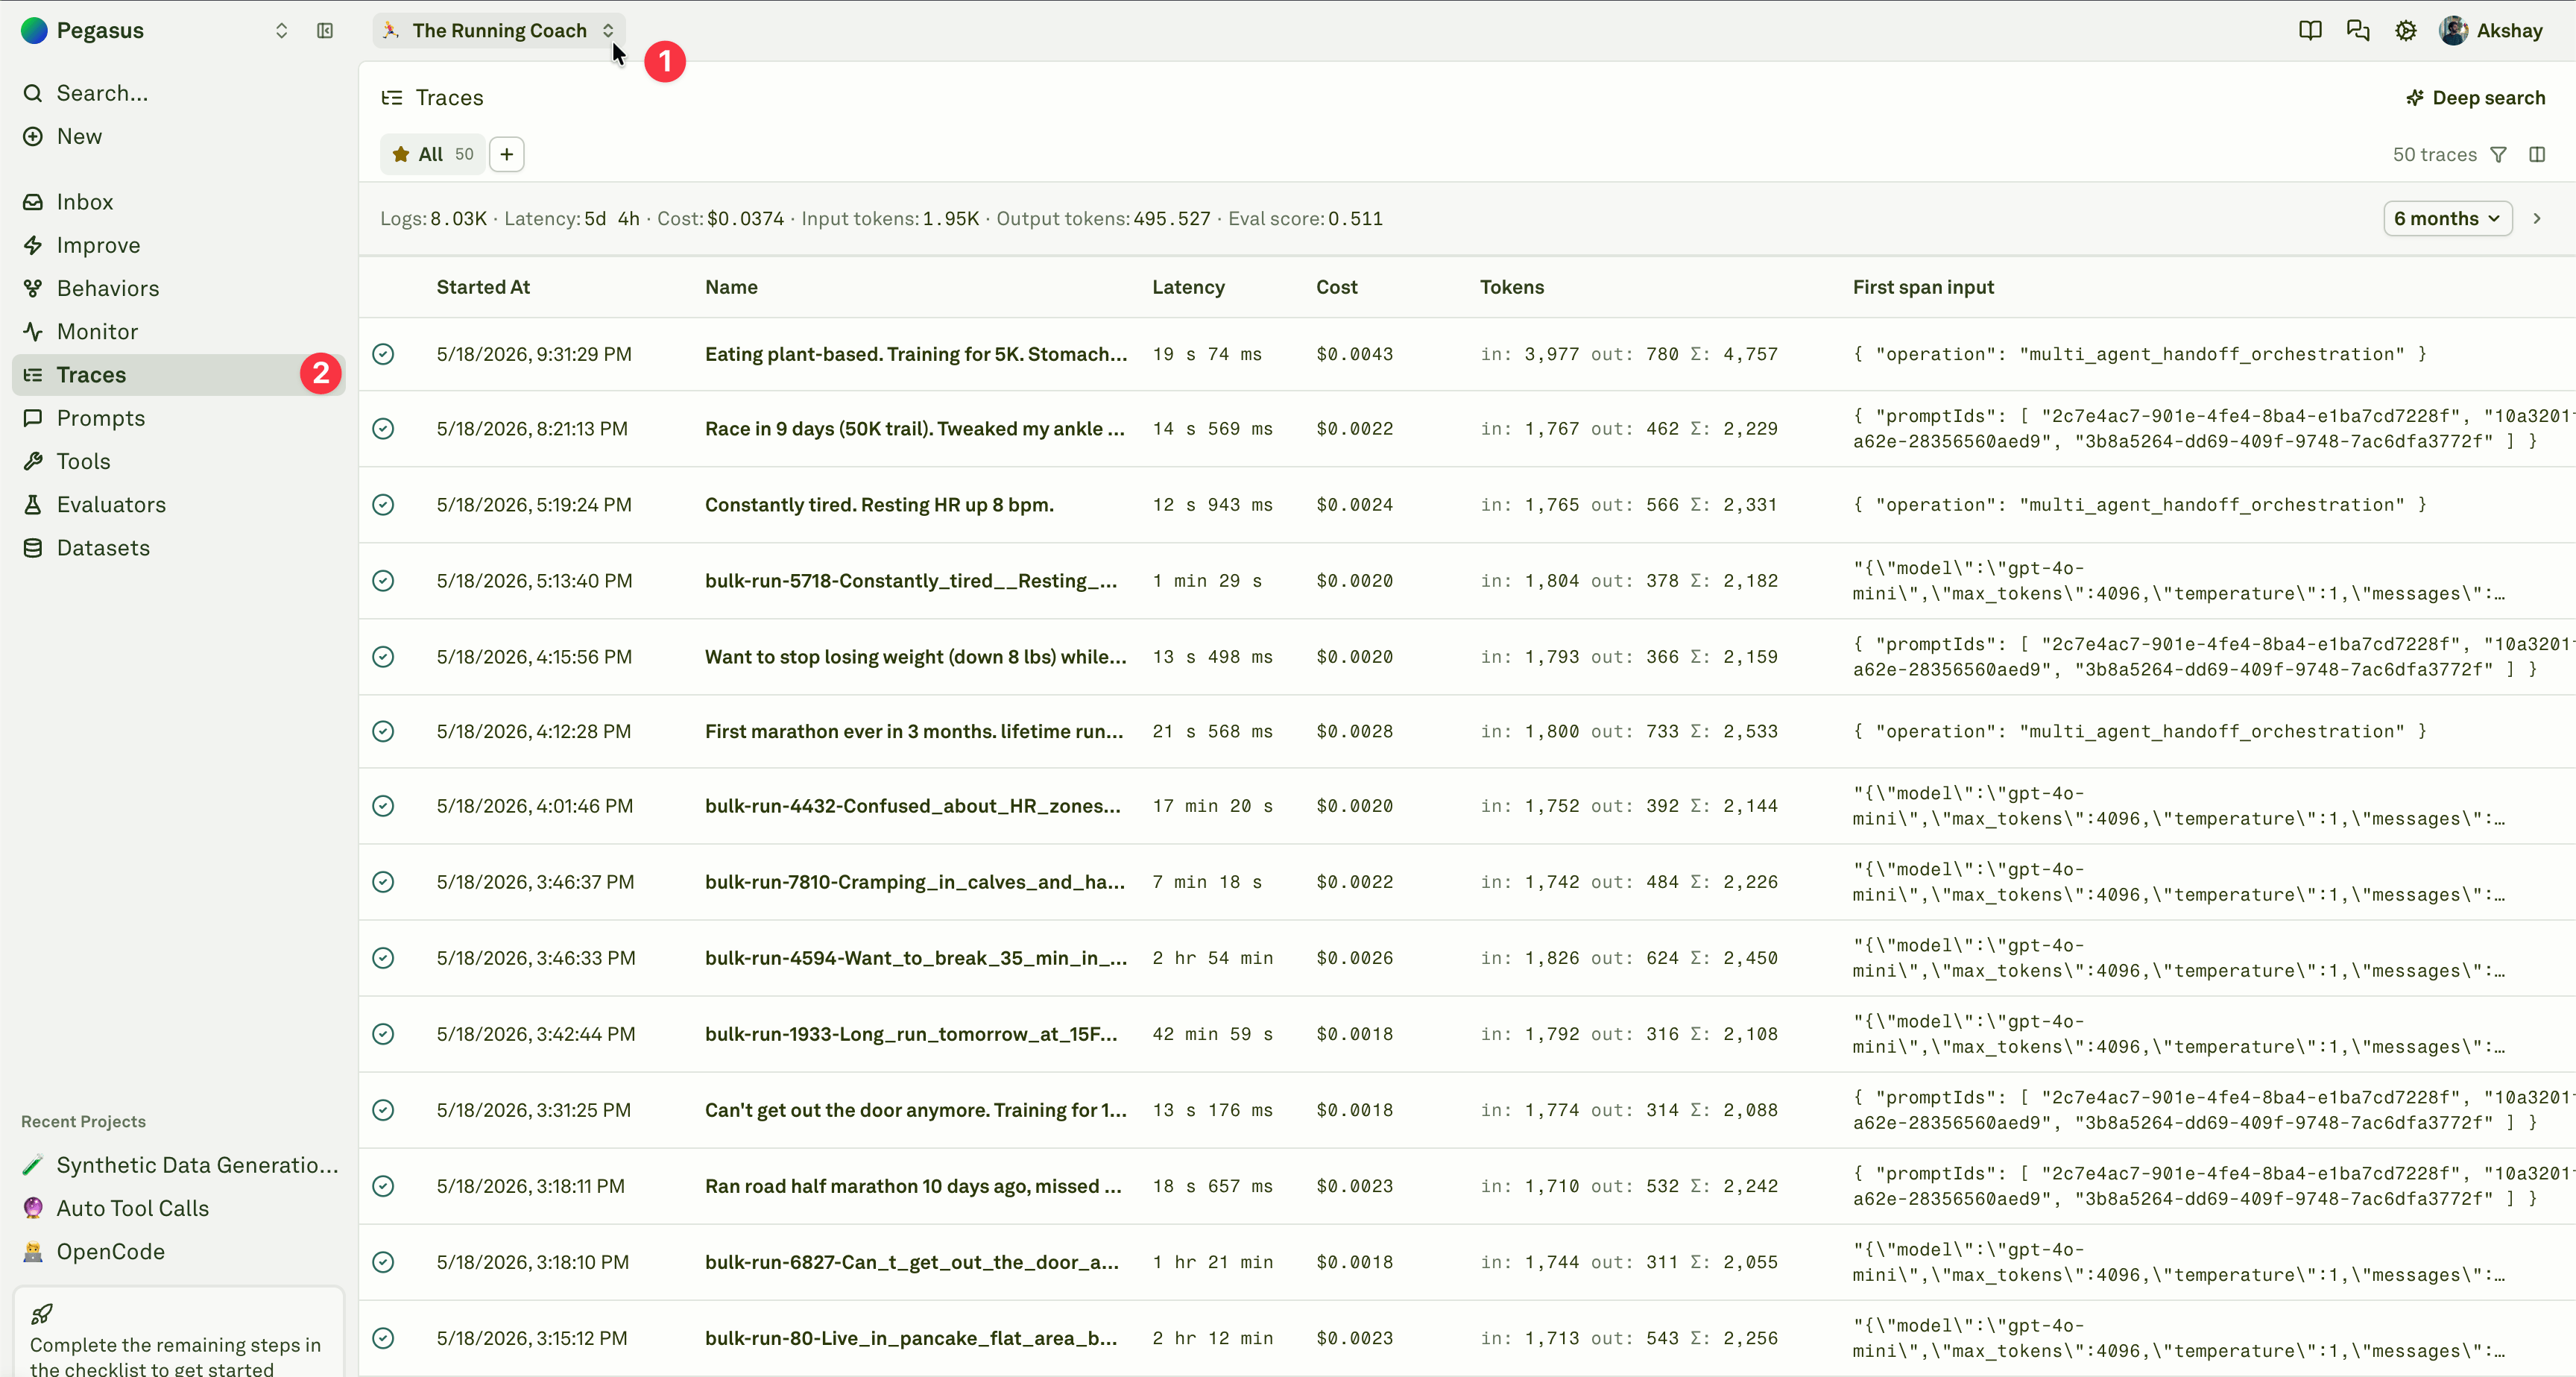 Click on any trace to open the trace side sheet. Each trace contains one or more **spans** representing individual operations, such as an LLM call, tool invocation, retrieval step, embedding call, or custom workflow step.
Select a span inside the trace to inspect its status, timing, model/provider details, request content, response content, tokens, cost, attributes, and any metadata your integration sent.
Click on any trace to open the trace side sheet. Each trace contains one or more **spans** representing individual operations, such as an LLM call, tool invocation, retrieval step, embedding call, or custom workflow step.
Select a span inside the trace to inspect its status, timing, model/provider details, request content, response content, tokens, cost, attributes, and any metadata your integration sent.
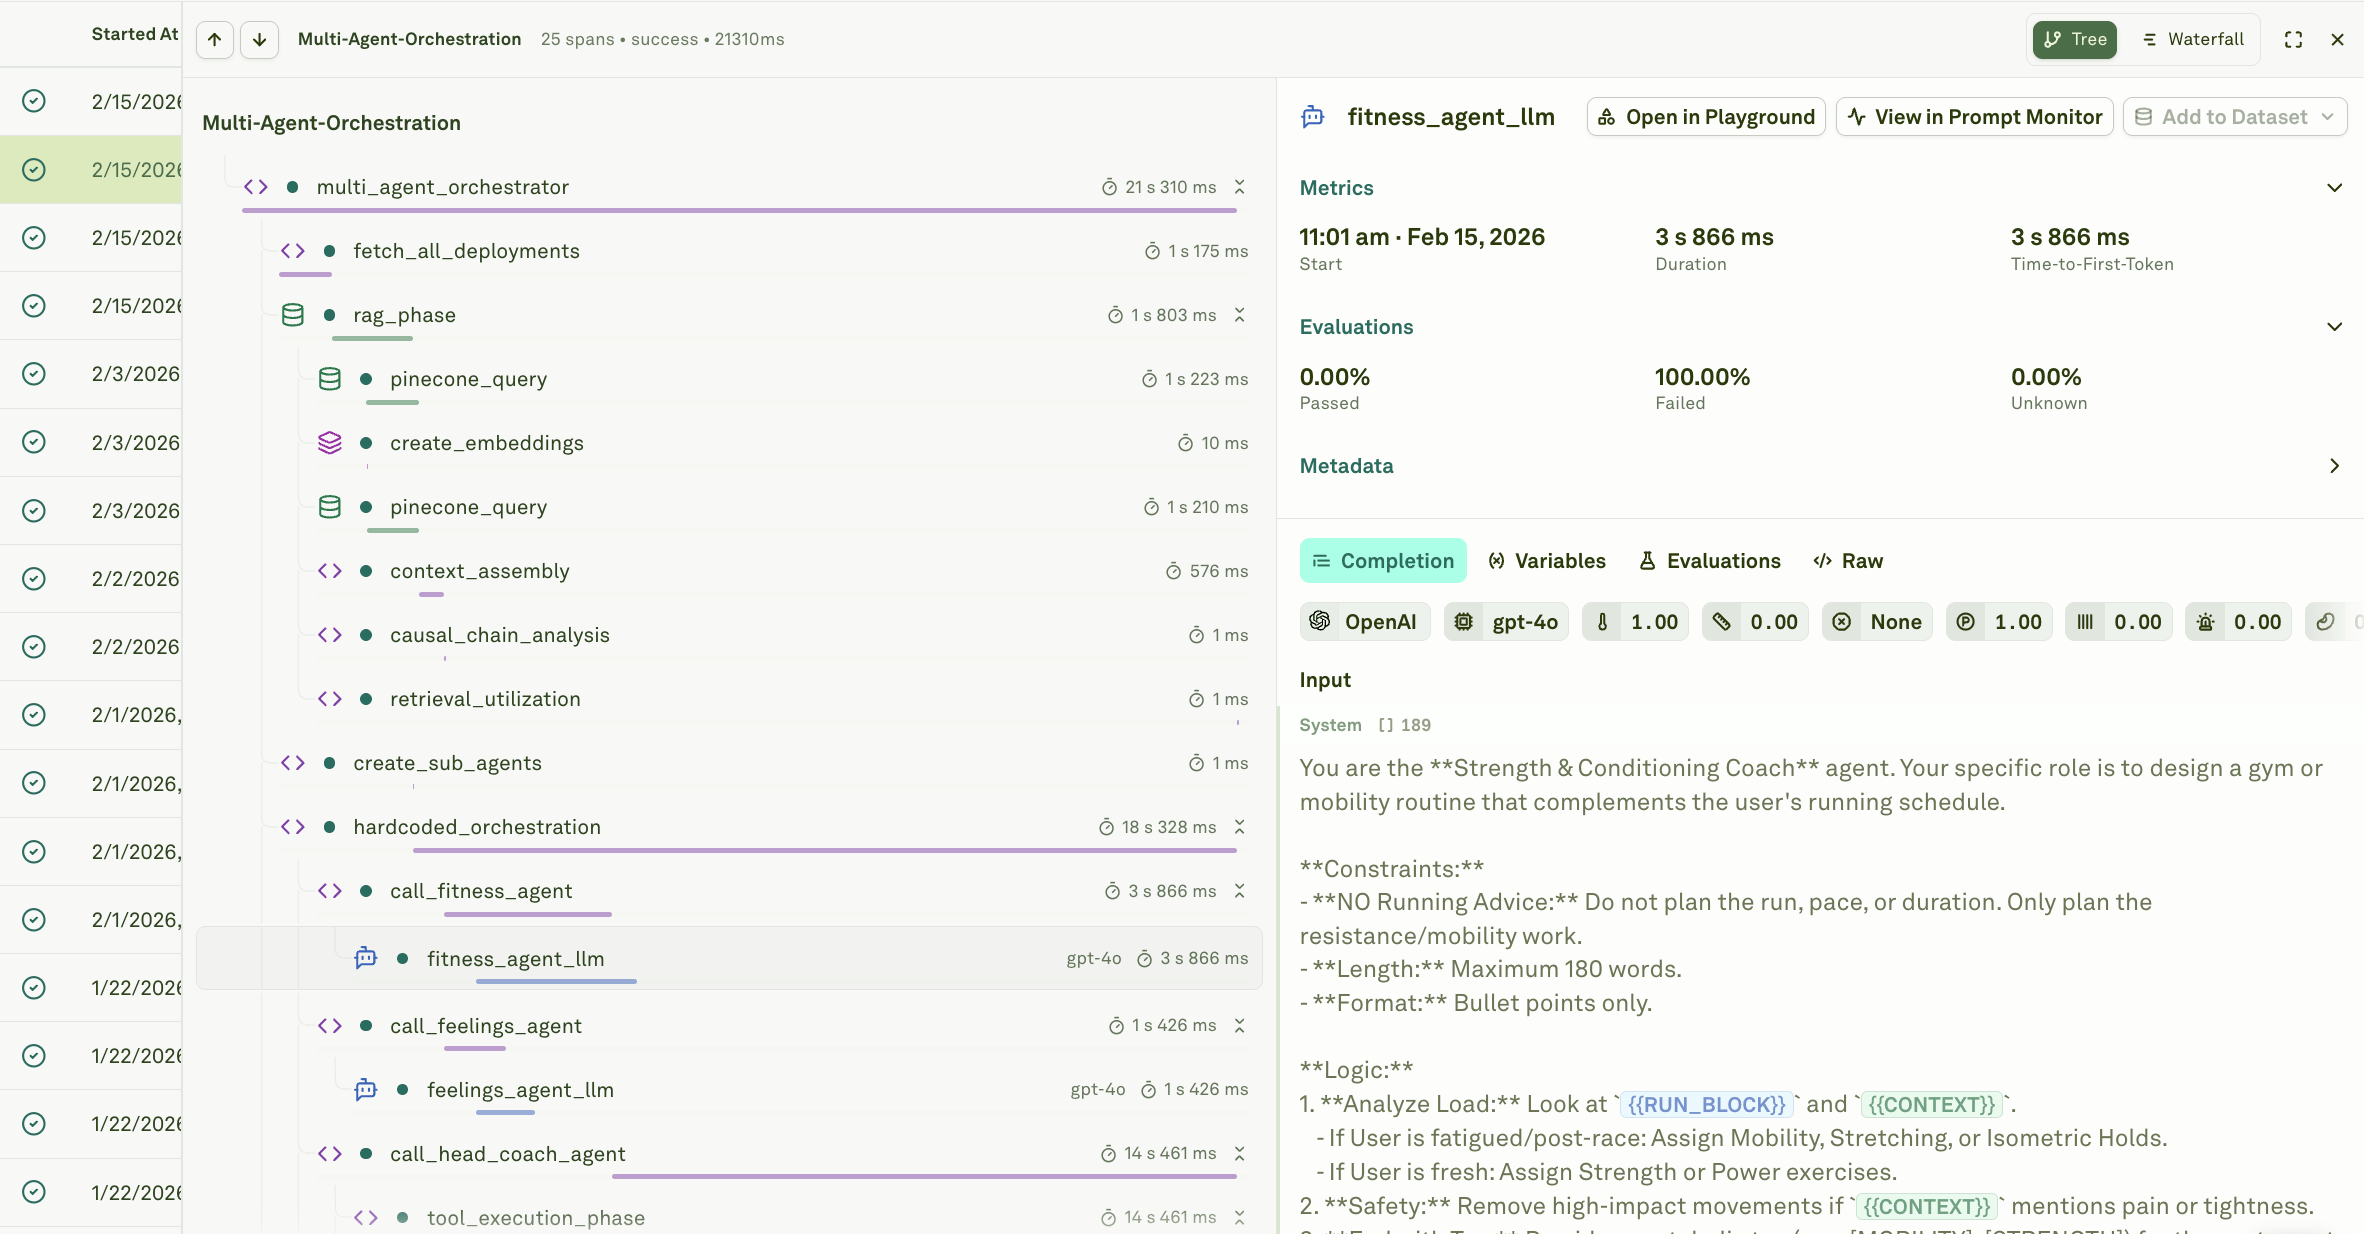 By default, the trace view is in a tree view. You can switch to a waterfall view by clicking the **Waterfall** button (top right).
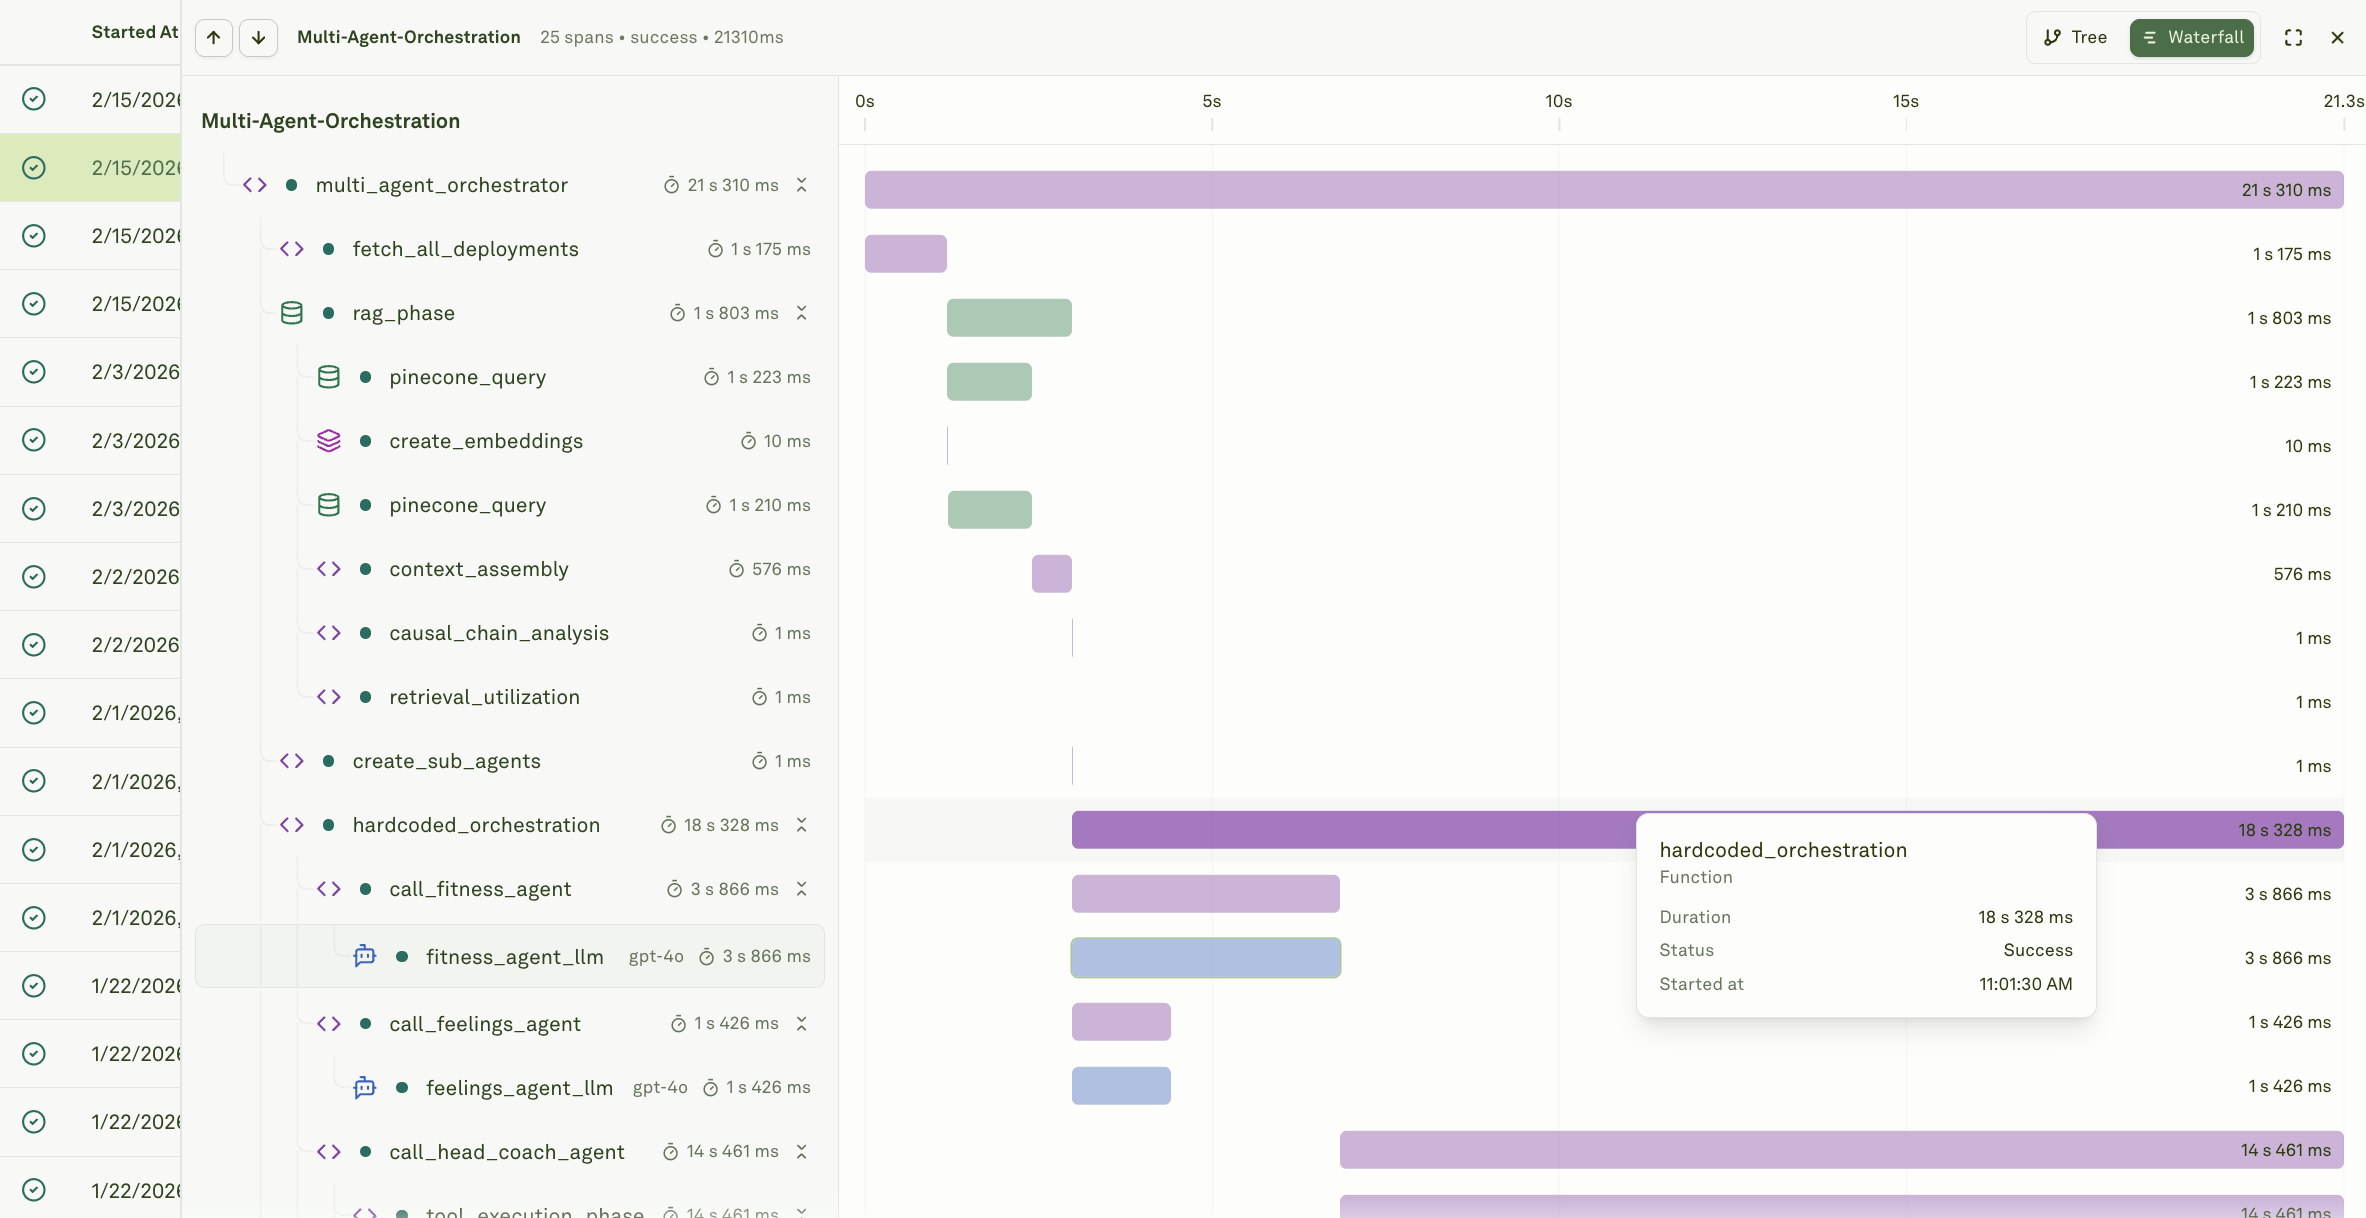 Before moving on, verify that the logs you expect are actually arriving in Adaline:
* Trace volume roughly matches the requests you just ran.
* Trace names are readable enough for a teammate to recognize the workflow.
* Span names describe the operation that happened, not just the library that emitted it.
* Model, tool, retrieval, or custom spans include the input and output content needed for debugging.
* Status, latency, tokens, cost, model, provider, tags, and attributes are populated wherever your integration can provide them.
* Sensitive values such as API keys, secrets, raw identifiers, and unnecessary private data are not being attached to traces or spans.
## 5. View Charts
Charts provide aggregated, time-series views of your AI agent's performance. They are automatically generated from the traces and spans flowing into Adaline, giving you a high-level operational dashboard without any additional configuration. Use charts to spot trends, detect anomalies, and then drill down into the underlying traces and spans for root cause analysis.
Click **Monitor** in the sidebar.
Before moving on, verify that the logs you expect are actually arriving in Adaline:
* Trace volume roughly matches the requests you just ran.
* Trace names are readable enough for a teammate to recognize the workflow.
* Span names describe the operation that happened, not just the library that emitted it.
* Model, tool, retrieval, or custom spans include the input and output content needed for debugging.
* Status, latency, tokens, cost, model, provider, tags, and attributes are populated wherever your integration can provide them.
* Sensitive values such as API keys, secrets, raw identifiers, and unnecessary private data are not being attached to traces or spans.
## 5. View Charts
Charts provide aggregated, time-series views of your AI agent's performance. They are automatically generated from the traces and spans flowing into Adaline, giving you a high-level operational dashboard without any additional configuration. Use charts to spot trends, detect anomalies, and then drill down into the underlying traces and spans for root cause analysis.
Click **Monitor** in the sidebar.
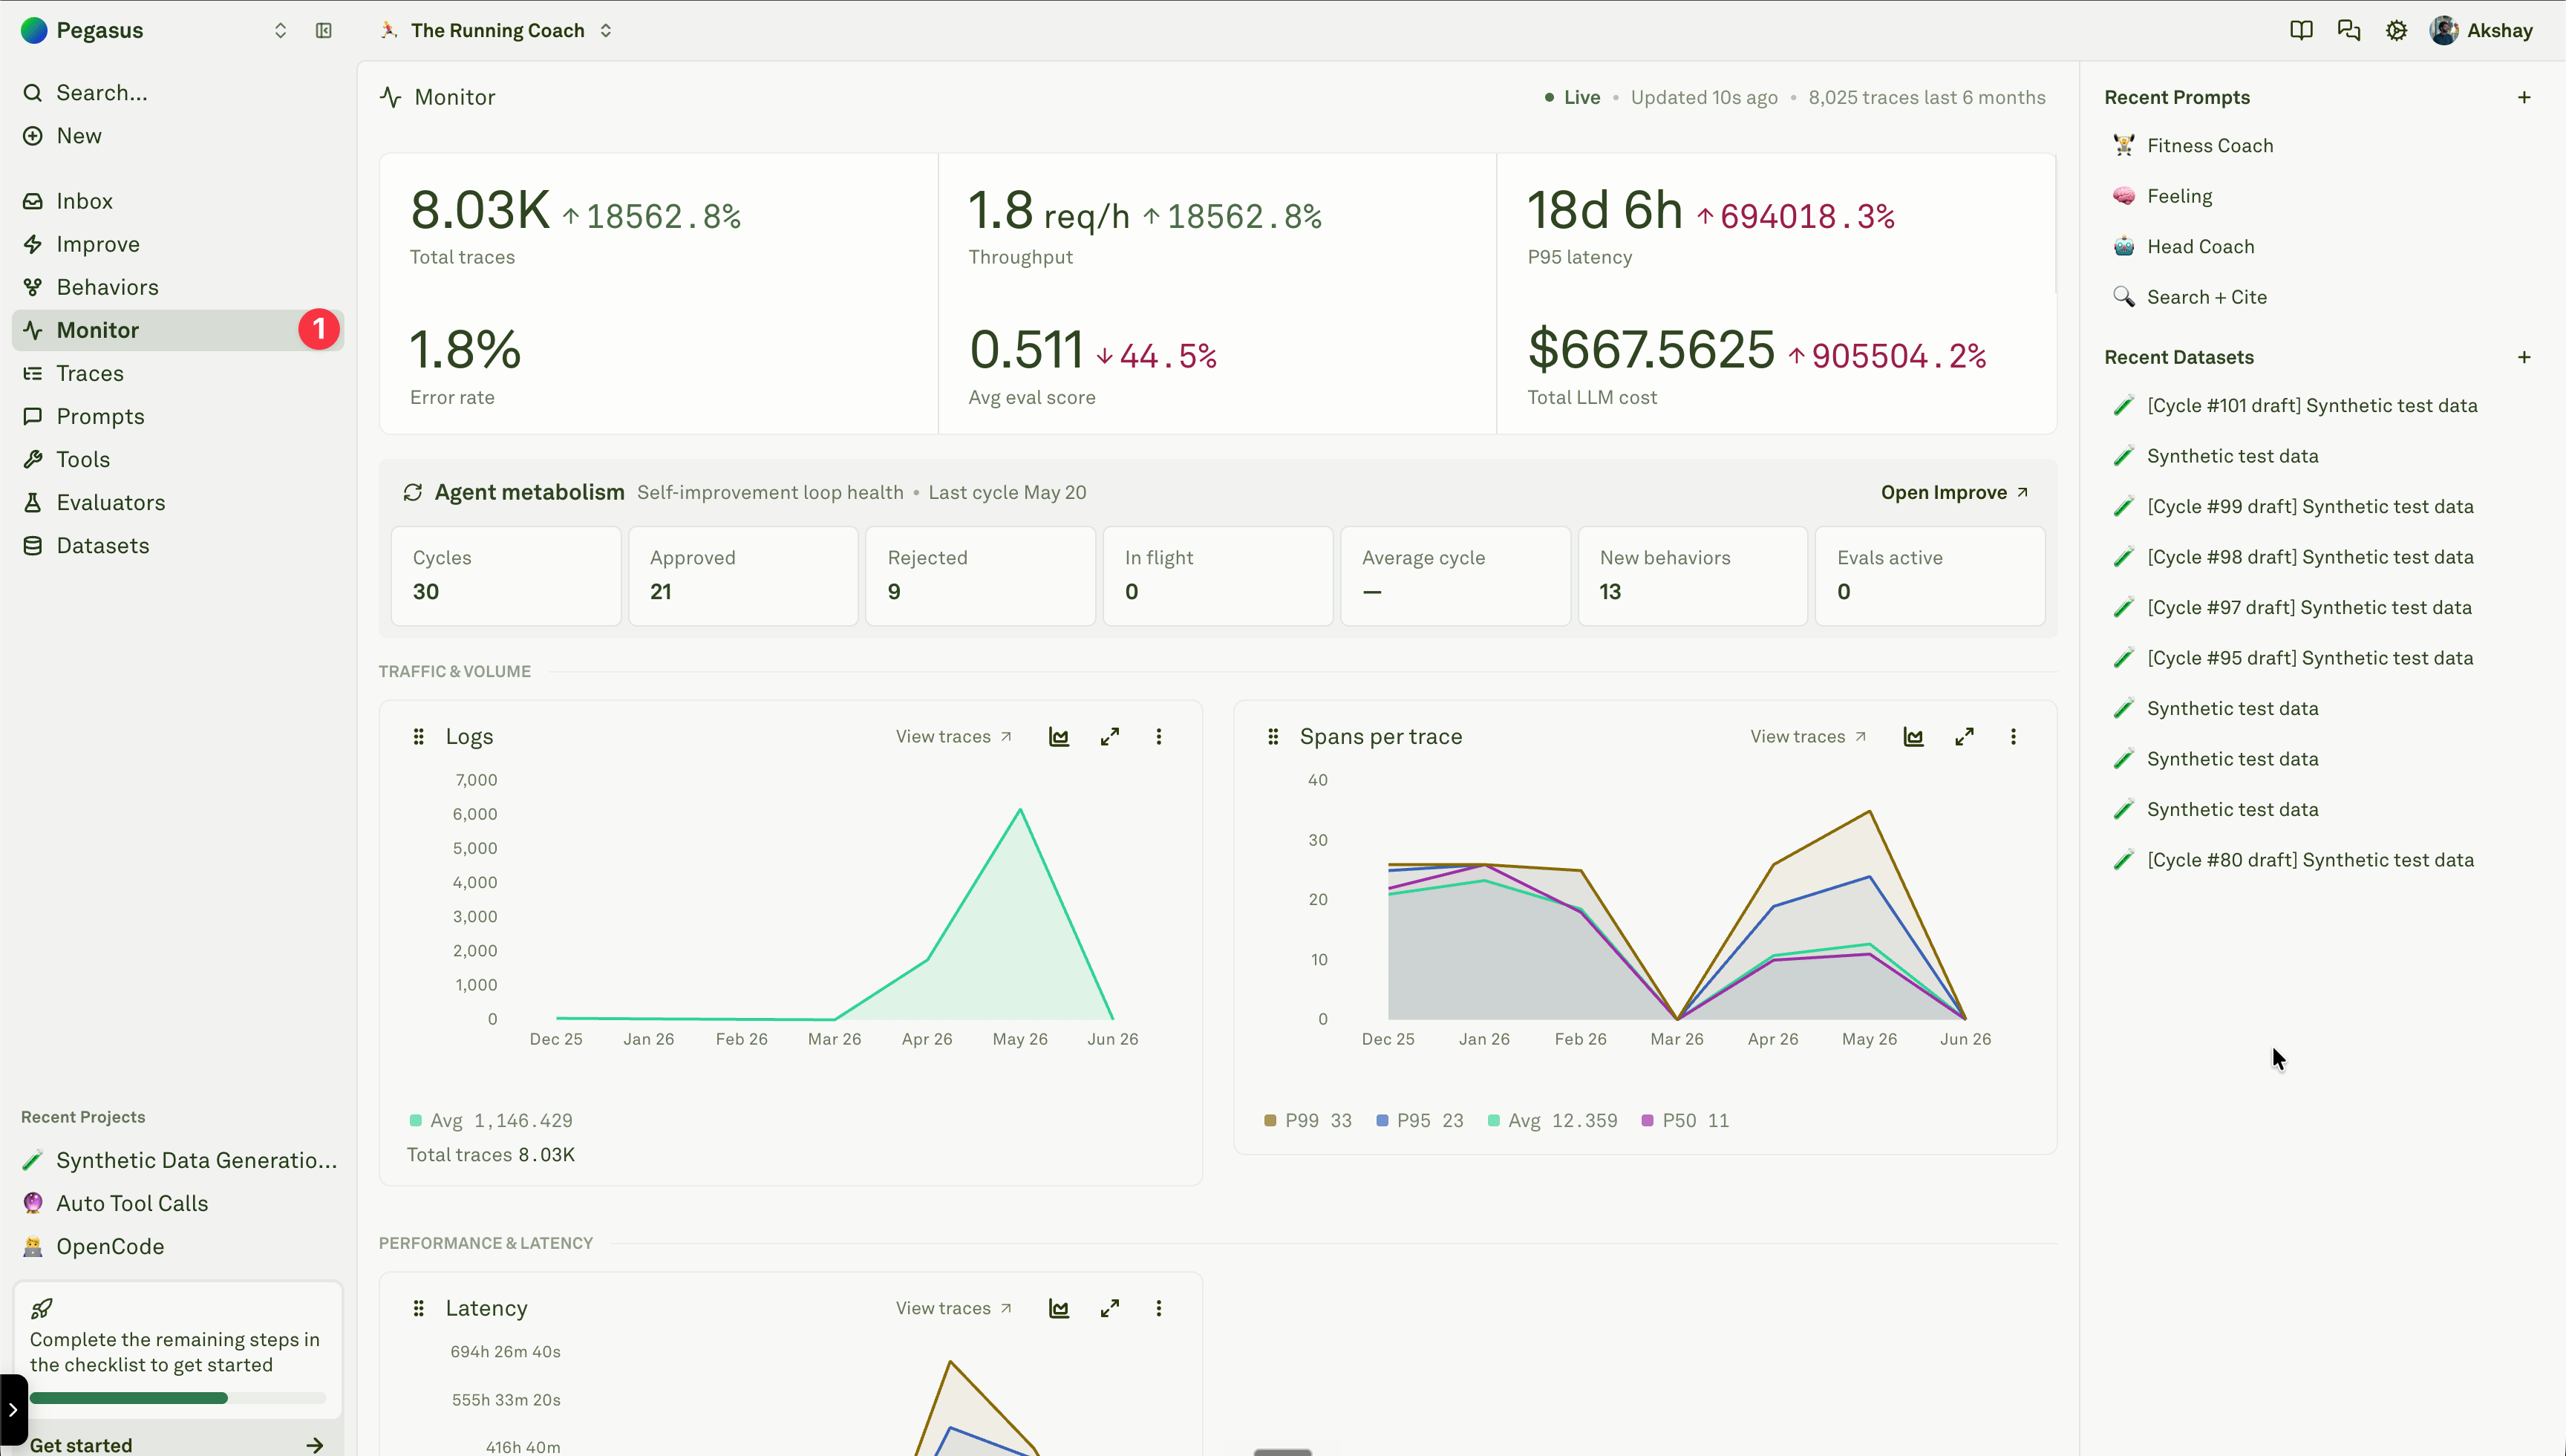 You will see dashboard charts for log volume, spans per trace, latency, cost, input tokens, output tokens, and evaluation score. Use these charts to confirm that traffic is arriving at the rate you expect and that the operational shape of your agent looks healthy.
Monitor also includes breakdowns that help you explain where a change came from:
* **Model breakdown** shows cost, token usage, latency, token efficiency, and cost per 1K tokens by model.
* **Environment breakdown** shows cost by environment, so you can separate staging, production, canaries, and other deployment paths when those values are sent.
* **Quality breakdown** shows evaluation score by evaluator and errors by status.
* **Performance breakdown** highlights slow prompts when prompt-level latency data is available.
* **Tool usage** shows function, tool, and retrieval span counts by name.
Together, these give you a complete picture of your AI agent's behavior in production — from the structure of every request, to its cost and speed — all in one place.
## 6. View Behaviors
After logs start flowing, Adaline begins grouping repeated patterns into **Behaviors**. Behaviors are not created from the very first log. In practice, expect them to appear after Adaline has both enough evidence and enough time to analyze it: roughly **15 minutes** and **about 100 logs** for the project. Both matter. A small trickle of logs may take longer, and higher-volume projects will usually reveal more Behavior patterns.
Click **Behaviors** in the sidebar.
You will see dashboard charts for log volume, spans per trace, latency, cost, input tokens, output tokens, and evaluation score. Use these charts to confirm that traffic is arriving at the rate you expect and that the operational shape of your agent looks healthy.
Monitor also includes breakdowns that help you explain where a change came from:
* **Model breakdown** shows cost, token usage, latency, token efficiency, and cost per 1K tokens by model.
* **Environment breakdown** shows cost by environment, so you can separate staging, production, canaries, and other deployment paths when those values are sent.
* **Quality breakdown** shows evaluation score by evaluator and errors by status.
* **Performance breakdown** highlights slow prompts when prompt-level latency data is available.
* **Tool usage** shows function, tool, and retrieval span counts by name.
Together, these give you a complete picture of your AI agent's behavior in production — from the structure of every request, to its cost and speed — all in one place.
## 6. View Behaviors
After logs start flowing, Adaline begins grouping repeated patterns into **Behaviors**. Behaviors are not created from the very first log. In practice, expect them to appear after Adaline has both enough evidence and enough time to analyze it: roughly **15 minutes** and **about 100 logs** for the project. Both matter. A small trickle of logs may take longer, and higher-volume projects will usually reveal more Behavior patterns.
Click **Behaviors** in the sidebar.
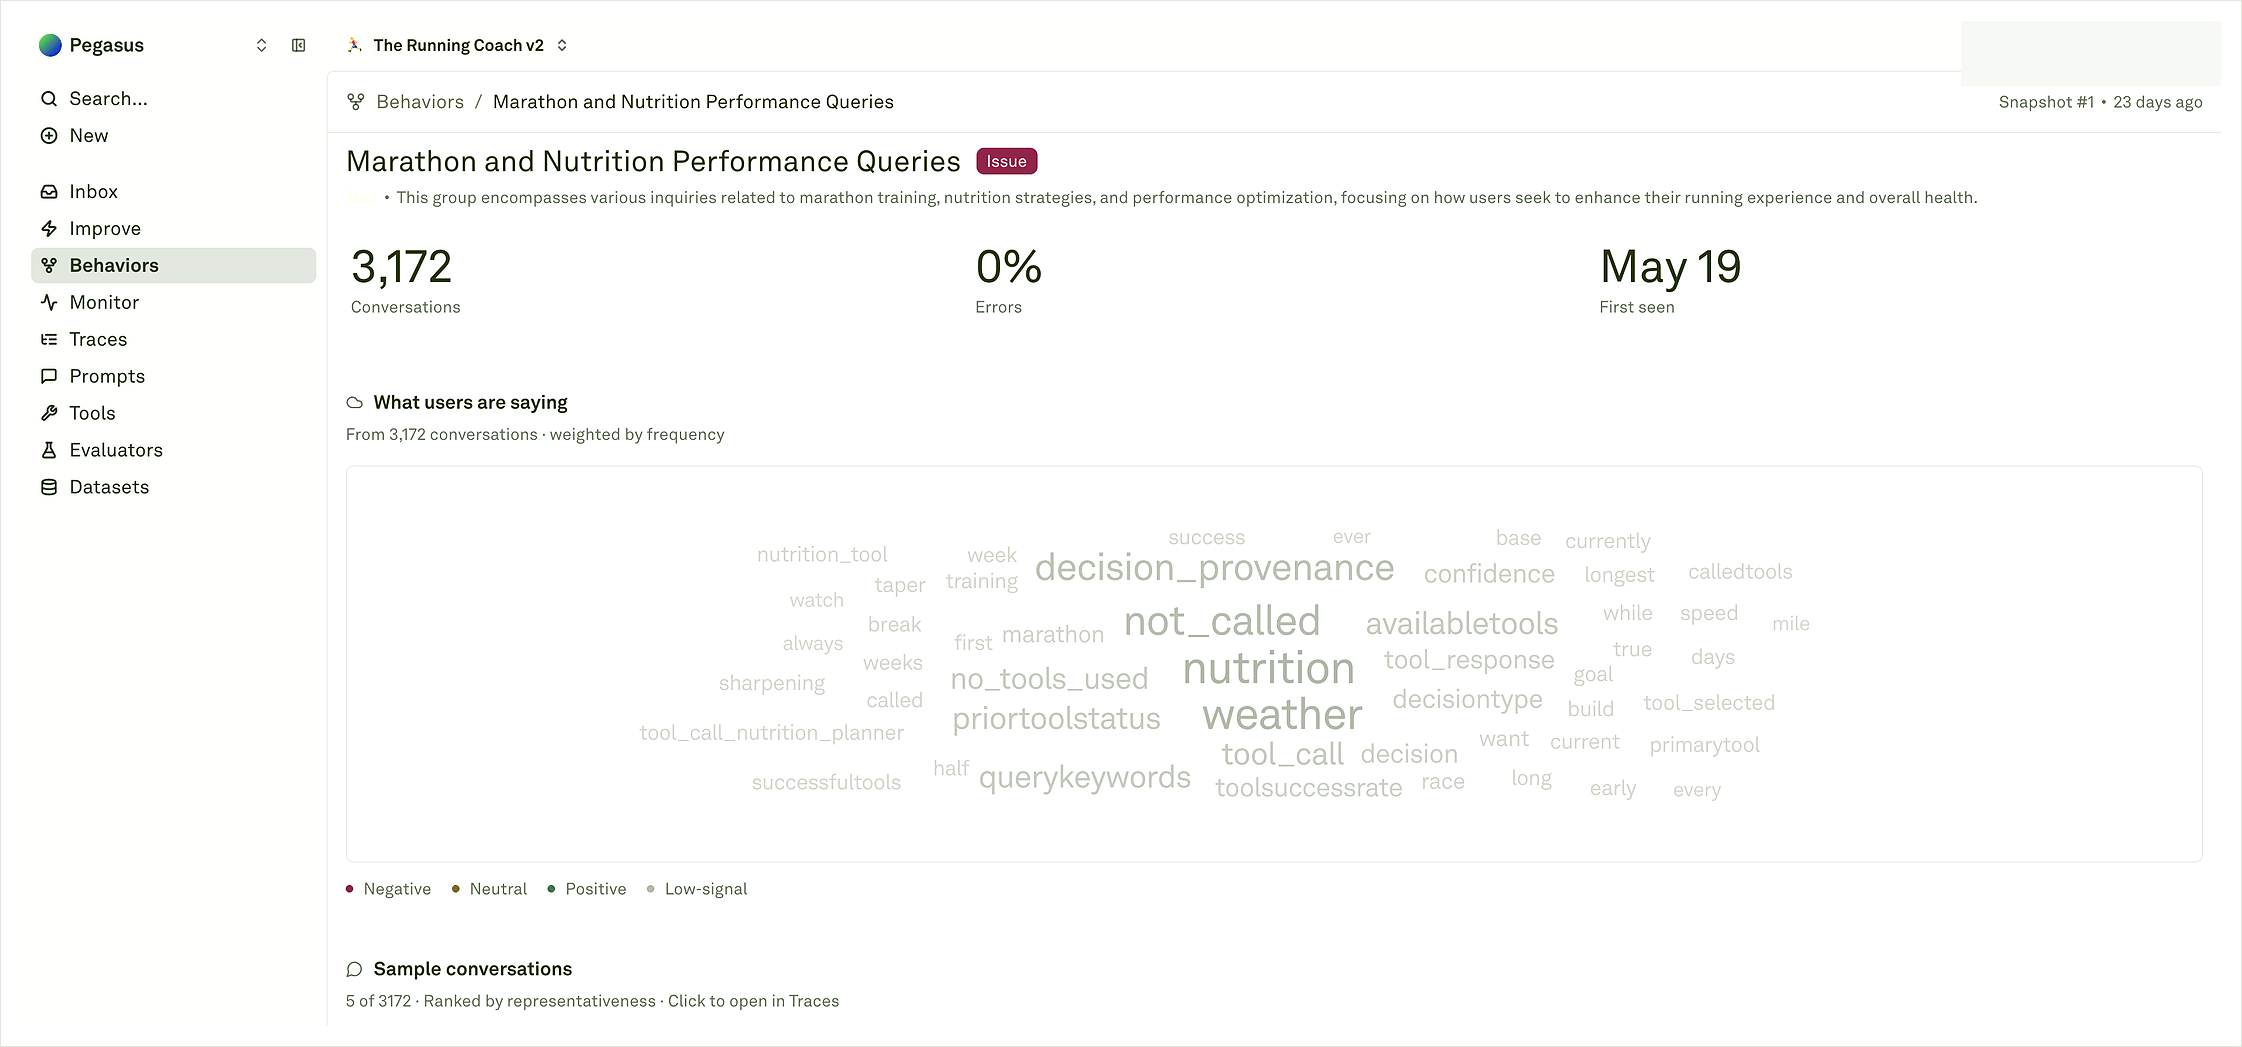
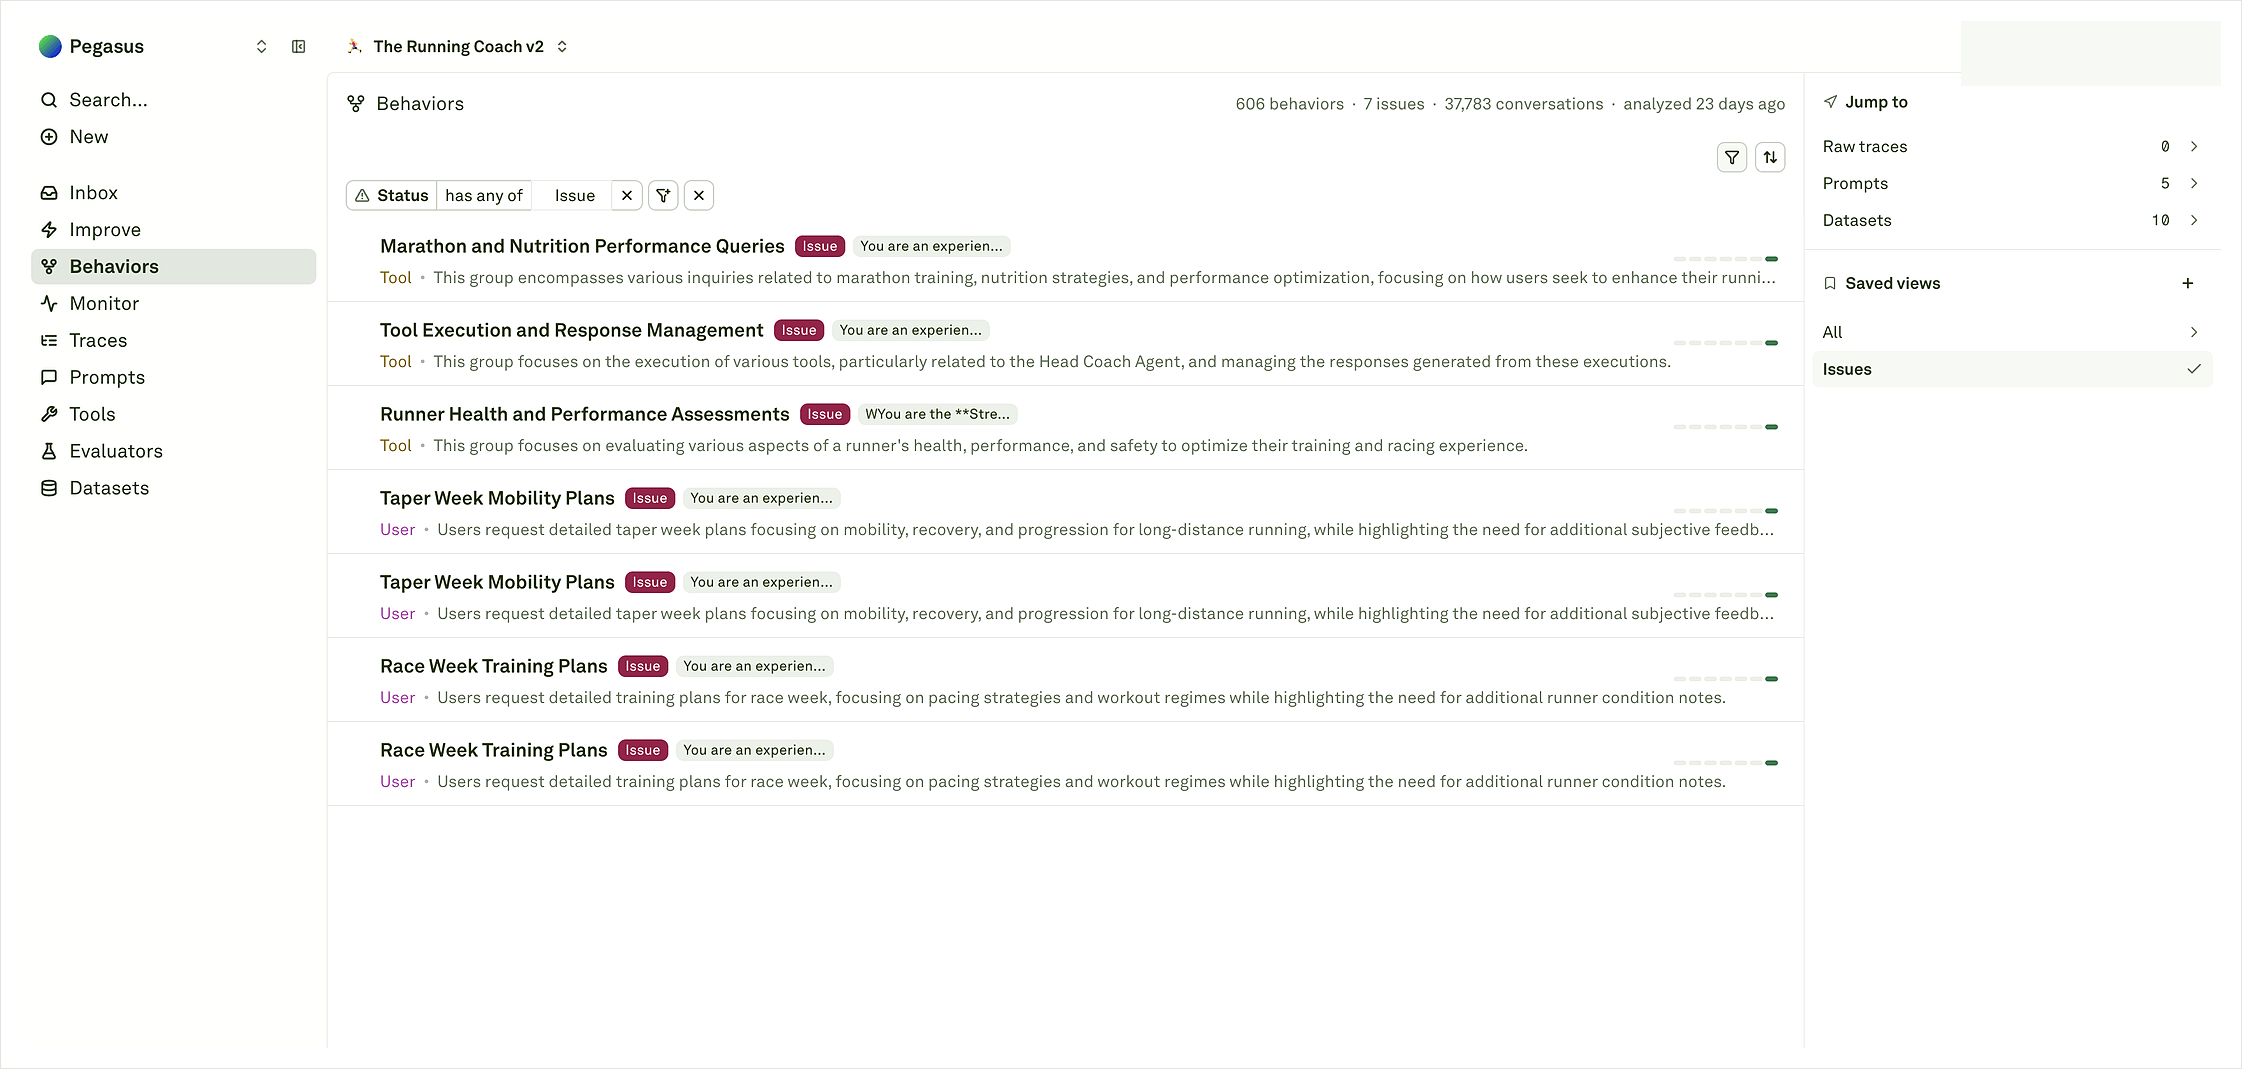 Behaviors help you move from raw logs to repeated customer and agent patterns. A Behavior can represent a recurring user intent, assistant habit, tool pattern, or issue diagnosis. Use the list to see what keeps happening across traffic instead of treating every trace as an isolated example.
Open a Behavior to inspect its summary, conversation volume, error rate, sample conversations, heatmap, timeline, and links back to source traces and spans.
Behaviors help you move from raw logs to repeated customer and agent patterns. A Behavior can represent a recurring user intent, assistant habit, tool pattern, or issue diagnosis. Use the list to see what keeps happening across traffic instead of treating every trace as an isolated example.
Open a Behavior to inspect its summary, conversation volume, error rate, sample conversations, heatmap, timeline, and links back to source traces and spans.
 Use Behaviors to decide what to do next:
* Watch high-volume healthy workflows so future releases do not regress them.
* Add repeated edge cases to datasets when they should become regression coverage.
* Start an Improve cycle when the pattern is prompt-level and has representative evidence.
* Debug tools, retrieval, or backend logic when the source spans show the fix belongs outside the prompt.
Read [Behaviors overview](/docs/behaviors/overview) to understand the pattern layer, then use [Logs to Behaviors](/docs/behaviors/logs-to-behaviors) to improve the quality of the evidence you send.
Next, run the [Run your first prompt](/docs/get-started/run-your-first-prompt) quickstart to create and test a prompt inside Adaline. Behaviors can reveal helpful production patterns from your logs, but Improve cycles need a prompt stored in Adaline before Adaline can propose, review, and apply prompt changes.
Congratulations! You have successfully integrated your AI agent with Adaline.
Use Behaviors to decide what to do next:
* Watch high-volume healthy workflows so future releases do not regress them.
* Add repeated edge cases to datasets when they should become regression coverage.
* Start an Improve cycle when the pattern is prompt-level and has representative evidence.
* Debug tools, retrieval, or backend logic when the source spans show the fix belongs outside the prompt.
Read [Behaviors overview](/docs/behaviors/overview) to understand the pattern layer, then use [Logs to Behaviors](/docs/behaviors/logs-to-behaviors) to improve the quality of the evidence you send.
Next, run the [Run your first prompt](/docs/get-started/run-your-first-prompt) quickstart to create and test a prompt inside Adaline. Behaviors can reveal helpful production patterns from your logs, but Improve cycles need a prompt stored in Adaline before Adaline can propose, review, and apply prompt changes.
Congratulations! You have successfully integrated your AI agent with Adaline.